Volkswagen Tiguan Service and Repair Manual: Transmission Housing and Clutch Housing
Overview - Transmission Housing
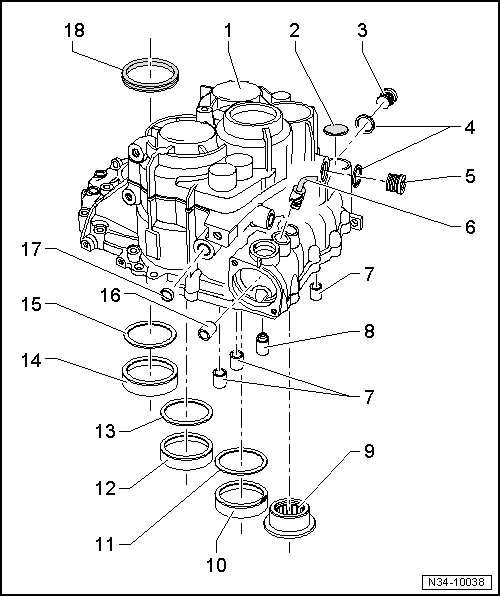
- Transmission Housing
- When replacing: adjust the output shafts and differential.
- Changes near the mount area for the cover/input shaft.
- Allocate component according to the Parts Catalog
- Cap
- Removing.
- Installing.
- Oil Drain Plug
- Tightening specification.
- Seal
- if present, replace after removing
- Oil Filler Plug
- Tightening specification.
- Locking Elbow
- Adjusting the gearshift mechanism.
- Can be replaced with transmission not disassembled
- Removing
- Installation position.
- Installing.
- Bearing Bushing
- For the selector rods
- Removing.
- Installing.
- Retaining Sleeve
- Removing when the transmission is disassembled.
- Removing when the transmission is not disassembled.
- Different retaining sleeves.
- Installing a retaining sleeve with a shoulder.
- Installing the retaining sleeve without a shoulder.
- Needle Sleeve
- For the reverse shaft
- Replace after removing
- Removing.
- Installing.
- Outer Race/Tapered Roller Bearing
- Output Shaft, 5th, 6th and Reverse Gears
- Removing and installing.
- When replacing: adjust output shaft for 5th/6th and reverse gear.
- Shim
- Output Shaft, 5th/6th and Reverse Gears
- Adjustment overview.
- Outer Race/Tapered Roller Bearing
- Output Shaft, 1st to 4th Gears
- Removing and installing.
- Adjust, if output shaft for 1st to 4th gear is replaced.
- Shim
- Output Shaft, 1st to 4th Gears
- Adjustment overview.
- Outer Race/Tapered Roller Bearing
- For the differential
- Removing and installing.
- When replacing: adjust the differential.
- Shim
- For the differential
- Adjustment overview.
- Bearing Bushing
- For the selector shaft
- Removing.
- Installing.
- Plugs
- Removing.
- Installing.
- Seal
- For the left flange shaft
- Replace after removing.
Overview - Clutch Housing
- Bearing Bushing
- For the selector rods
- Replace after removing
- Removing.
- Installing.
- Needle Sleeve
- For the reverse shaft
- Replace after removing
- Removing.
- Installing.
- Alignment Sleeve
- Quantity: 2
- Clutch Housing
- When replacing: adjust the output shafts and differential.
- Cap
- Not on all clutch housings
- Input Shaft Seal
- Replace after removing.
- Seal
- Replace after removing
- FWD - for the right flange shaft
- FWD.
- FWD with front axle differential lock between the manual transmission and the front axle differential lock.
- AWD - between the manual transmission and bevel box
- AWD.
- Washer
- Installed position: the shoulder on the inner diameter faces the seal -item 7-
- Outer Race/Tapered Roller Bearing
- For the differential
- FWD, removing and installing.
- FWD with Front Axle Differential Lock, Removing and installing.
- AWD, removing and installing.
- When replacing: adjust the differential.
- Oil Deflector Ring
- Installed position: shoulder at hole points toward output shaft
- Outer Race/Tapered Roller Bearing
- Output Shaft, 1st to 4th Gears
- Removing and installing.
- Adjust, if output shaft for 1st to 4th gear is replaced.
- Outer Race/Tapered Roller Bearing
- Output Shaft, 5th, 6th and Reverse Gears
- Removing and installing.
- When replacing: adjust output shaft for 5th/6th and reverse gears.
- Washer
- Output Shaft, 5th/6th and Reverse Gears
- Always 0.65 mm thick
- Cylindrical Roller Bearing
- For the input shaft
- Removing and installing.
- Magnet
- Held in place by housing joint surface
Transmission Housing, Servicing
Special tools and workshop equipment required
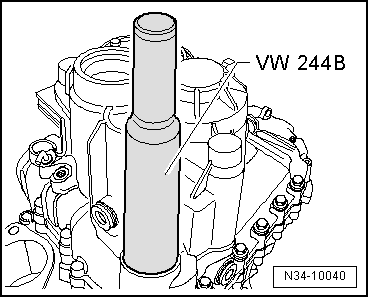
- Bearing Driver - Multiple Use -VW244B-
- Transmission Support -VW353-
- Press Plate -VW401-
- Press Plate -VW402-
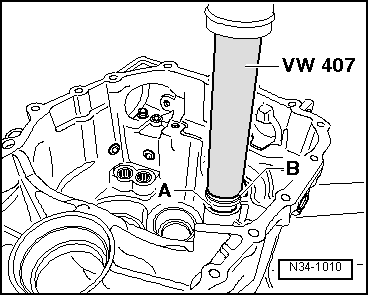
- Press Piece - Rod -VW407-
- Press Piece - 37mm -VW416B-
- Guide Pin -VW436A-
- Press Piece - Guide Pin -VW439-
- Slide Hammer Set -VW771-
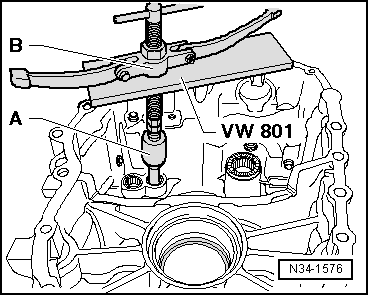
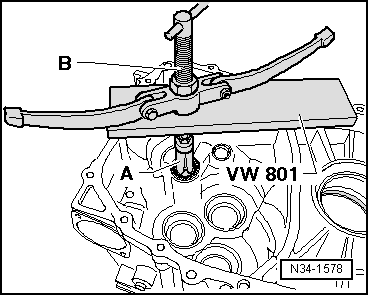
- Crankshaft Holding Fixture -VW801-
- Guide Pins -10-15-
- Press Piece - Pivot Mount Bushing -3124-
- Bearing Installer - Crankshaft Pilot Bearing -3264-
- Subframe Support Tool -3290-
- Torque Wrench 1331 5-50Nm -VAG1331-
- Bushing Driver - Selector Shaft -T10168-
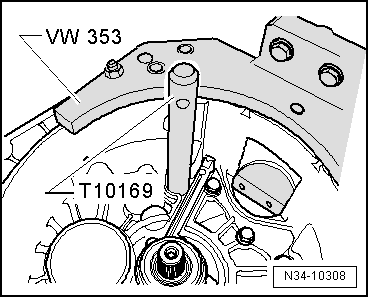
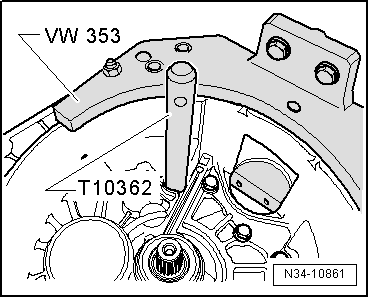
- Locking Sleeve Drift -T10169- or Locking Sleeve Drift -T10362-.
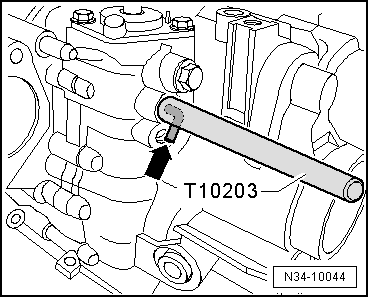
- Breather Tube Tool -T10203-
- -1-Puller - Kukko Internal - 14-19mm -21/2-
- -1-Puller - Kukko Internal - 20-30mm -21/4-
- -4-Puller - Kukko Counterstay -22/2-
- Thread adaptor from Puller - Kukko Counterstay -22/1-
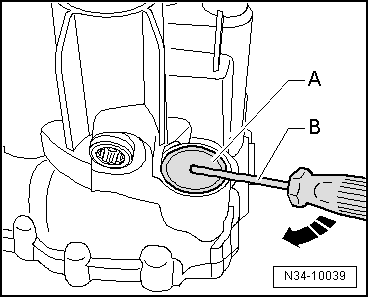
Removing the Cover -A-
- Pierce the rubber in the center of the cover with a screwdriver -B- and pry it out of the cover in direction of -arrow-.
Installing the Cover
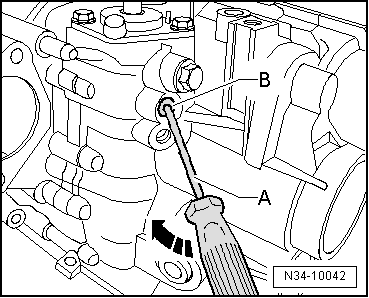
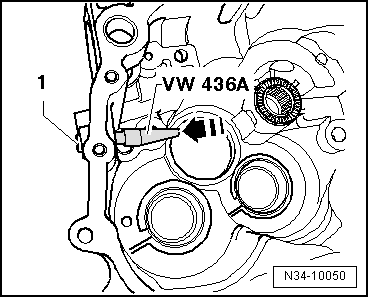
Removing the Locking Elbow for the Gearshift Shaft
- Break off the bracket in its unlocked position.
- Insert a screwdriver -A- into the hole in the locking bracket -B-.
- Pry out the locking elbow in direction of -arrow-.
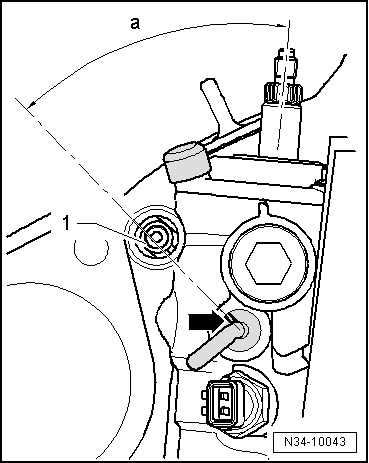
Installed Position: Locking Elbow
- The mark on the locking elbow -arrow- must point toward the connection on the clutch slave cylinder -1-.
- Dimension -a- must be approximately 45º.
Drive Lock Elbow -arrow- for Selector Shaft in up to Tool Stop.
Note
The locking elbow must be unlocked when being installed.
Removing the Shift Rod Bearing Bushing
- 14.5 to 18.5 mm Internal Puller -21/2-, for example.
- Puller - Kukko Counterstay -Kukko 22/2-, for example.
Installing the Shift Rod Bearing Bushing All the Way onto the Tool
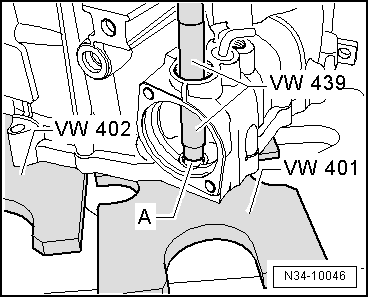
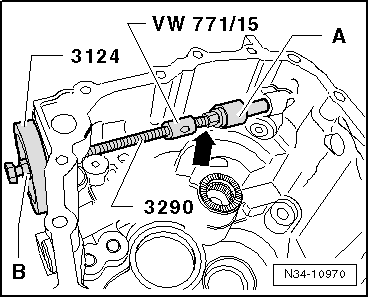
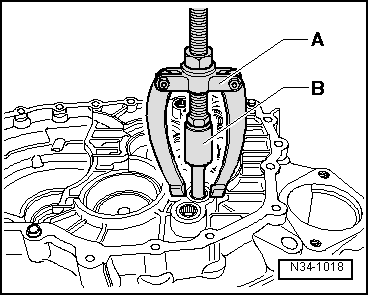
Removing the Retaining Sleeve -A- from the Transmission Housing
- Place transmission housing on Press Plate -VW401- and press plate -VW402- in such a way so that the alignment sleeves inside the transmission housing do not get damaged.
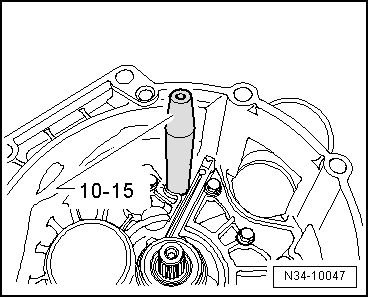
Removing the Retaining Sleeve on a Transmission Not Disassembled Using the Guide Pins -10-15-.
- Locking bolt and selector shaft removed.
- Turn the transmission so that the retaining sleeve cannot fall into the transmission.
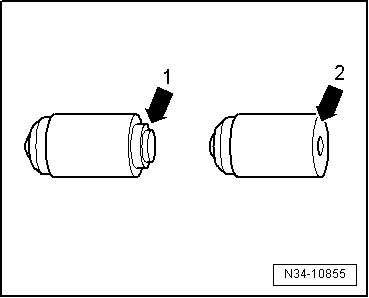
Lock Sleeve Differentiation
The following lock sleeves may be installed:
Lock sleeve with a shoulder -arrow 1-.
Lock sleeve without a shoulder -arrow 2-.
Allocate the components. Refer to the Parts Catalog.
Drive in Lock Sleeve with Shoulder as Far as Stop on Tool
- The transmission housing is bolted to the clutch housing.
Drive in Lock Sleeve without Shoulder as Far as Stop on Tool
- The transmission housing is bolted to the clutch housing.
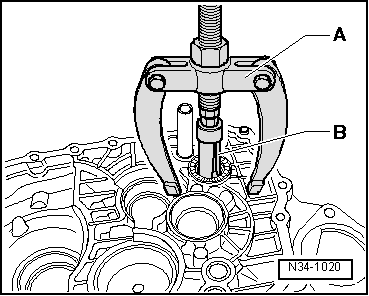
Removing the Reverse Shaft Needle Sleeve from the Transmission Housing
- Puller - Kukko Internal - 20-30mm -21/4-, for example.
- Puller - Kukko Counterstay -22/2-, example.
Note
The needle sleeve will get damaged when it is removed and must be replaced.
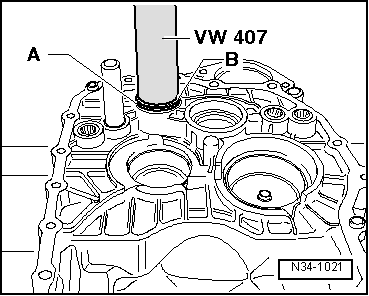
Installing the Needle Sleeve -A- into the Transmission Housing
- Lay the reverse shaft thrust washer -B- on the needle sleeve while pressing it in.
- Support the transmission housing with the Press Piece - 37mm -VW416B- directly under the bearing mount.
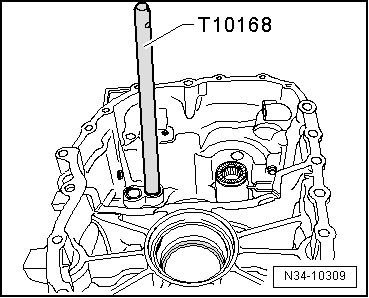
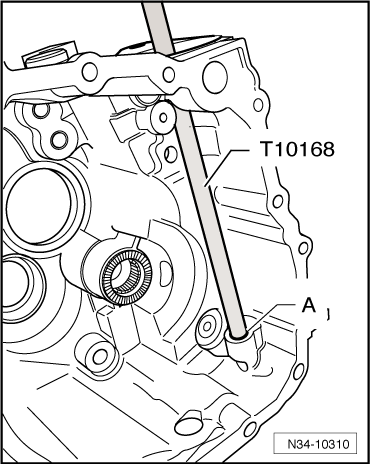
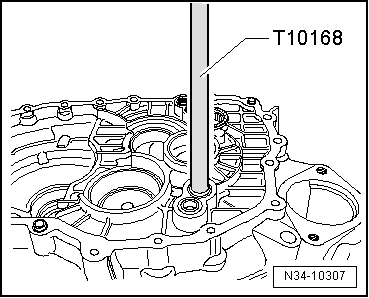
Removing the Selector Shaft Bearing Bushing
- Use the thread adapter from Puller - Kukko Counterstay -22/1--arrow-.
- Hold the spindle on the Subframe Support Tool -3290- steady and turn the nut -B-.
- Puller - Kukko Internal - 14-19mm -21/2-, for example.
Installing the Gearshift Shaft Bearing Bushing -A- All the Way Onto the Tool
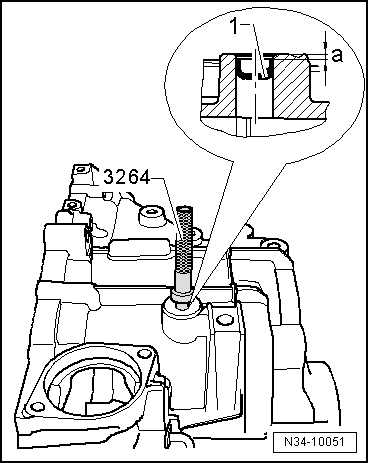
Removing the Plug -1-
- Remove the plug -1- from the inside of the transmission housing to the outside.
Installing the Plug -1-
- Using the Bearing Installer - Crankshaft Pilot Bearing -3264-, drive in the sealing plugs to dimension -a- approximately 3 mm below the upper edge of the housing.
Clutch Housing, Servicing
Special tools and workshop equipment required
- Press Piece - Rod -VW407-
- Bushing Driver - Selector Shaft -T10168-
- Seal Installer - Drive Axle -T40008-
- -1-Puller - Kukko Internal - 14-19mm -21/2-
- -1-Puller - Kukko Internal - 20-30mm -21/4-
- -4-Puller - Kukko Counterstay -22/1-
- -4-Puller - Kukko Counterstay -22/2-
Removing the Shift Rod Bearing Bushing
- Puller - Kukko Counterstay -22/1-, for example.
- Puller - Kukko Internal - 14-19mm, for example.
Installing the Shift Rod Bearing Bushing All the Way onto the Tool
Removing the Needle Sleeve from the Clutch Housing
- Puller - Kukko Counterstay -22/2-, for example.
- Puller - Kukko Internal - 20-30mm -21/4-, for example.
Note
The needle sleeve will get damaged when it is removed and must be replaced.
Installing the Needle Sleeve -A- into the Clutch Housing
- Lay the reverse shaft thrust washer -B- on the needle sleeve while pressing it in.
 Transmission, Disassembling and Assembling
Schematic Overview - Transmission
Schematic Overview - Transmission, FWD
Clutch Housing
Reverse Shaft
5th, 6th and Reverse Gear Output Shaft
Clutch Slave Cylinder with Release Bearing
Input Sh ...
 Special Tools
Special tools and workshop equipment required
Bearing Driver - Multiple Use -VW244B-
Transmission Support -VW353-
Press Plate -VW401-
Press Plate -VW402-
Press Piece - Rod -VW407-
Press Piece ...
See More:
Volkswagen Tiguan Owners Manual > Some basics: Technical terms explained
Fig. 155 Illustration of A: ascent angle.
B: lateral gradient.
Read and follow the introductory information and
safety information first⇒Introduction
to the subject The technical date in the table below only apply to ideal
conditions. The values were determined on flat, firm, and non-sl ...
Volkswagen Tiguan Owners Manual
Volkswagen Tiguan Service and Repair Manual
- Body exterior
- Body Interior
- General Paint Information
- Paint
- Brake System
- Suspension, Wheels, Steering
- Wheel and Tire Guide
- Towing Guide
- Wheel and Tire Guide General Information
- Communication
- Electrical Equipment General Information
- Electrical Equipment from 06/2011
- Heating, Ventilation and Air Conditioning
- Refrigerant R134a Servicing
- 6-Speed Manual Transmission 02Q, OBB, and OFB
