Volkswagen Tiguan Service and Repair Manual: Adapter for Assembling Flushing Circuit
- The following table lists the different adapters necessary to connect
the service station to the refrigerant circuit, to flush and to bypass the
removed receiver/dryer or reservoir and expansion valve (depending on the
vehicle).
- Using a charge hose with 5/8 -18 UNF connections (short version, for
example Refrigerant Circuits Adapter Set 1 - Hose 31 -VAS6338/31-), connect
the two adapters (contained in Refrigerant Circuits Adapter Set 1
-VAS6338/1-) which have been installed for the removed reservoir or
receiver/dryer.
- If a flushed refrigerant circuit is not reassembled immediately after
flushing, adapters remain at connections and seal the connections at the
adapters using Refrigerant Circuits Adapter Set 1 - Adapter 30 -VAS6338/30-
(from Refrigerant Circuits Adapter Set 1 -VAS6338/1-).
- Depending on the version of the A/C compressor and on the time period of
production, various connecting and sealing technologies can be found on the
refrigerant circuit. Refer to Heating, Ventilation and Air Conditioning.
Block or screw connections
- Screw connection -A-
- Block connection -B-
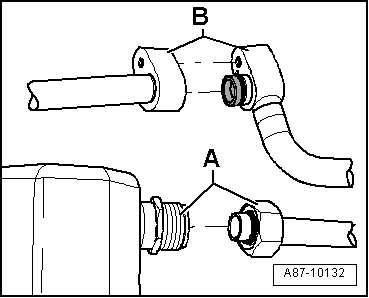
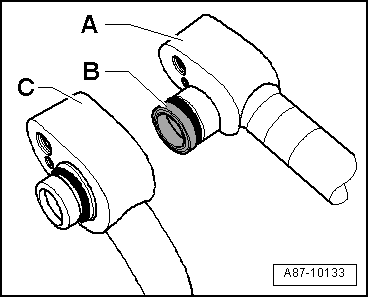
Block connections with different types of seals
Block connection with radially sealed connection -A-
(with plastic or metal guide -B-)
- Block connection with axial sealing connection -C-
Fox MY 2005
| Vehicle |
Required adapters for
refrigerant pipes to A/C compressor |
Required adapters for
refrigerant pipes to receiver/dryer |
Miscellaneous |
| Fox from MY 2005 |
- Low pressure side Refrigerant Circuits Adapter Set 1 - Adapter
12 -VAS6338/12-
- High pressure side Refrigerant Circuits Adapter Set 1 - Adapter
2 -VAS6338/2-
|
- Remove dryer cartridge and seal receiver/dryer.
- Install a new dryer cartridge after flushing.
|
- Replace the expansion valve with the Refrigerant Circuits
Adapter Set 1 - Adapter 34 -VAS6338/34-
- Install a new expansion valve after flushing.
|
Lupo MY 1999
| Vehicle |
Required adapters for
refrigerant pipes to A/C compressor |
Required adapters for
refrigerant pipes to receiver/dryer |
Miscellaneous |
| Lupo from MY 1999 through
VIN 70000 |
- Low pressure side Refrigerant Circuits Adapter Set 1 - Adapter
12 -VAS6338/12-
- High pressure side Refrigerant Circuits Adapter Set 1 - Adapter
2 -VAS6338/2-
|
- Remove receiver/dryer and bridge coolant pipes.
- Refrigerant Circuits Adapter Set 1 - Adapter 28 -VAS6338/28-
- Refrigerant Circuits Adapter Set 1 - Adapter 29 -VAS6338/29-
- Install a new receiver/dryer after flushing.
|
- Expansion valve replaced by Refrigerant Circuits Adapter Set 1 -
Adapter 19 -VAS6338/19- (or a drilled open expansion valve for
example 6N0 820 679 C)
- Install a new expansion valve after flushing.
|
| Lupo from MY 1999 from VIN
70001 |
- Low pressure side Refrigerant Circuits Adapter Set 1 - Adapter
12 -VAS6338/12-
- High pressure side Refrigerant Circuits Adapter Set 1 - Adapter
2 -VAS6338/2- or
- Refrigerant Circuits Adapter Set 1 - Adapter 7 -VAS6338/7-
|
Receiver/Dryer
- May be flushed.
- Install a new receiver/dryer after flushing.
|
- Replace the expansion valve with the Refrigerant Circuits
Adapter Set 1 - Adapter 19 -VAS6338/19- (or a drilled open expansion
valve, for example 6N0 820 679 C)
- Install a new expansion valve after flushing.
|
up! 2012; e-up! MY 2014
| Vehicle |
Required adapters for
refrigerant pipes to A/C compressor |
Required adapters for
refrigerant pipes to receiver/dryer |
Miscellaneous |
| up! e-up! from MY 2012 From MY
2014 |
- Low pressure side Refrigerant Circuits Adapter Set 1 - Adapter
12 -VAS6338/12-
- High pressure side Refrigerant Circuits Adapter Set 1 - Adapter
3 -VAS6338/3-
- Flush electrically-driven A/C compressor using Refrigerant
Circuits Adapter Set - Adapter 40 -VAS6338/40- and Refrigerant
Circuits Adapter Set - Adapter 41 -VAS6338/41-.
|
Receiver/Dryer
- May be flushed.
- Install a new receiver/dryer after flushing.
|
- Replace the expansion valve with the Refrigerant Circuits
Adapter 36 -VAS6338/36- or Refrigerant Circuits Adapter Set 1 -
Adapter 34 -VAS6338/34- (or a drilled open expansion valve, for
example 1S0 820 078)
- Install a new expansion valve after flushing.
|
Polo MY 1995
| Vehicle |
Required adapters for
refrigerant pipes to A/C compressor |
Required adapters for
refrigerant pipes to receiver/dryer |
Miscellaneous |
| Polo from MY 1995 through
VIN 50000 |
Refrigerant Circuits
Adapter Set 1 - Adapter 14 - VAS6338/14- |
- Remove receiver/dryer and bridge coolant pipes.
- Refrigerant Circuits Adapter Set 1 - Adapter 28 -VAS6338/28-
- Refrigerant Circuits Adapter Set 1 - Adapter 29 -VAS6338/29-
- Install a new receiver/dryer after flushing.
|
- Replace the expansion valve with the Refrigerant Circuits
Adapter Set 1 - Adapter 19 -VAS6338/19- (or a drilled open expansion
valve, for example 6N0 820 679 C)
- Install a new expansion valve after flushing.
|
| Polo from MY 1995 from VIN
50001 |
- Low pressure side Refrigerant Circuits Adapter Set 1 - Adapter 7
-VAS6338/7-
- High pressure side Refrigerant Circuits Adapter Set 1 - Adapter
2 -VAS6338/2-
|
Receiver/Dryer
- May be flushed.
- Install a new receiver/dryer after flushing.
|
- Replace the expansion valve with the Refrigerant Circuits
Adapter Set 1 - Adapter 19 -VAS6338/19- (or a drilled open expansion
valve, for example 6N0 820 679 C)
- Install a new expansion valve after flushing.
|
Polo MY 2002
| Vehicle |
Required adapters for
refrigerant pipes to A/C compressor |
Required adapters for
refrigerant pipes to receiver/dryer |
Miscellaneous |
| Polo from MY 2002 |
- Low pressure side Refrigerant Circuits Adapter Set 1 - Adapter
12 -VAS6338/12
- High pressure side Refrigerant Circuits Adapter Set 1 - Adapter
2 -VAS6338/2-
|
- Remove dryer cartridge and seal receiver/dryer.
- Install a new dryer cartridge after flushing.
|
- Replace the expansion valve with the Refrigerant Circuits
Adapter Set 1 - Adapter 34 -VAS6338/33- (or a drilled open expansion
valve )
- Install a new expansion valve after flushing.
|
Caddy MY 1996; Caddy MY 2004; Caddy MY 2011
| Vehicle |
Required adapters for
refrigerant pipes to A/C compressor |
Required adapters for
refrigerant pipes to receiver/dryer |
Miscellaneous |
| Caddy from MY 1996 |
- Low pressure side Refrigerant Circuits Adapter Set 1 - Adapter 4
-VAS6338/4-
- High pressure side Refrigerant Circuits Adapter Set 1 - Adapter
2 -VAS6338/2- or Refrigerant Circuits Adapter Set 1 - Adapter 14
-VAS6338/14-
|
- Remove receiver/dryer and bridge coolant pipes.
- Refrigerant Circuits Adapter Set 1 - Adapter 28 -VAS6338/28-
- Refrigerant Circuits Adapter Set 1 - Adapter 29 -VAS6338/29-
- Install a new receiver/dryer after flushing.
|
- Replace the expansion valve with the Refrigerant Circuits
Adapter Set 1 - Adapter 19 -VAS6338/19- (or a drilled open expansion
valve, for example 6N0 820 679 C)
- Install a new expansion valve after flushing.
|
| Caddy from MY 2004; Caddy from
MY 2011 |
- Sanden / Denso A/C compressor
- Low pressure side Refrigerant Circuits Adapter Set 1 - Adapter
12 -VAS6338/12-
- High pressure side Refrigerant Circuits Adapter Set 1 - Adapter
3 -VAS6338/3-
- 7H0 820 803 D A/C compressor
- Low pressure side Refrigerant Circuits Adapter Set 1 - Adapter 7
-VAS6338/7-
- High pressure side Refrigerant Circuits Adapter Set 1 - Adapter
2 -VAS6338/2-
|
Receiver/Dryer
- May be flushed.
- Install a new receiver/dryer after flushing.
|
- Replace the expansion valve with the Refrigerant Circuits
Adapter Set 1 - Adapter 18 -VAS6338/18- (or a drilled open expansion
valve )
- Install a new expansion valve after flushing.
|
Polo MY 2010; Polo KH IN MY 2010; Polo KH IN MY 2015; Polo Lim IN MY 2011;
Polo Lim In MY 2016; Polo Lim RUS MY 2011; Polo Lim RUS MY 2016; Polo KH MY
2014; Polo KH MY 2015; Polo Lim MY 2014; Polo Lim MY 2016 and Polo 2014
| Vehicle |
Required adapters for
refrigerant pipes to A/C compressor |
Required adapters for
refrigerant pipes to receiver/dryer |
Miscellaneous |
| Polo from MY 2010; Polo KH IN
from MY 2010; Polo KH IN from MY 2015; Polo Lim IN from MY 2011; Polo
Lim IN from MY 2016; Polo Lim RUS from MY 2011; Polo Lim RUS from MY
2016; Polo KH from MY 2014; Polo KH from MY 2015; Polo Lim from MY 2014;
Polo Lim from MY 2016 and Polo from MY 2014 |
- Low pressure side Refrigerant Circuits Adapter Set 1 - Adapter
12 -VAS6338/12-
- High pressure side Refrigerant Circuits Adapter Set 1 - Adapter
3 -VAS6338/3-
- For A/C compressors 6Q0 820 808 F and 6Q0 820 808 G, high
pressure side Refrigerant Circuits Adapter Set 1 - Adapter 2
-VAS6338/2-.
|
- Remove dryer cartridge and seal receiver/dryer.
- Install a new dryer cartridge after flushing.
|
- Replace the expansion valve with the Refrigerant Circuits
Adapter Set 1 - Adapter 34 -VAS6338/34- (or a drilled open expansion
valve)
- Install a new expansion valve after flushing.
|
Golf MY 1992; Vento MY 1992; Passat MY 1994
| Vehicle |
Required adapters for
refrigerant pipes to A/C compressor |
Required adapters for
refrigerant pipes to receiver/dryer |
Miscellaneous |
| Golf from MY 1992; Vento from
MY 1992; Passat from MY 1994 |
Refrigerant Circuits Adapter
Set 1 - Adapter 14 - VAS6338/14- |
- Remove receiver/dryer and bridge coolant pipes.
- Refrigerant Circuits Adapter Set 1 - Adapter 28 -VAS6338/28-
- Refrigerant Circuits Adapter Set 1 - Adapter 29 -VAS6338/29-
- Install a new receiver/dryer after flushing.
|
- Replace the expansion valve with the Refrigerant Circuits
Adapter Set 1 - Adapter 19 -VAS6338/19- (or a drilled open expansion
valve, for example 6N0 820 679 C
- Install a new expansion valve after flushing.
|
Touran MY 2003; Golf MY 2004; Golf Plus MY 2005; Golf Plus MY 2009; Jetta MY
2005; Eos MY 2006; Golf Variant MY 2007; Tiguan MY 2008; Scirocco MY 2009;
Scirocco MY 2015; Golf MY 2009; Golf Variant MY 2010; Jetta MY 2011; Golf Cabrio
MY 2012; NMS MY 2012; Beetle MY 2012 and Golf MY 2013
| Vehicle |
Required adapters for
refrigerant pipes to A/C compressor |
Required adapters for
refrigerant pipes to receiver/dryer |
Miscellaneous |
| Touran from MY 2003; Golf from
MY 2004; Golf Plus from MY 2005; Golf Plus from MY 2009; Jetta from MY
2005; Eos from MY 2006; Golf Variant from MY 2007; Tiguan from MY 2008;
Scirocco from MY 2009; Scirocco from MY 2015; Golf from MY 2009; Golf
Variant from MY 2010; Jetta from MY 2011; Golf Cabrio from MY 2012; NMS
from MY 2012 and Beetle from MY 2012 |
- Low pressure side Refrigerant Circuits Adapter Set 1 - Adapter
12 -VAS6338/12-
- High pressure side Refrigerant Circuits Adapter Set 1 - Adapter
3 -VAS6338/3-
|
There are two versions of the
receiver/dryer: Refer to the vehicle specific repair manual.
- Receiver/dryer with an installed dryer.
- May be flushed.
- Install a new receiver/dryer after flushing.
- receiver/dryer with dryer bag / cartridge
- Remove the dryer bag / cartridge and close the receiver/dryer.
- Install a new dryer bag / cartridge after flushing.
|
- Replace the expansion valve with the Refrigerant Circuits
Adapter Set 1 - Adapter 18 -VAS6338/18-
- Install a new expansion valve after flushing.
|
Golf MY 2013; Golf Wagon MY 2014; Golf MY 2014 (USA and Canada); Golf
Sportsvan MY 2015
| Vehicle |
Required adapters for
refrigerant pipes to A/C compressor |
Required adapters for
refrigerant pipes to receiver/dryer |
Miscellaneous |
| Golf from MY 2013; Golf Wagon
from MY 2014; Golf from MY 2014 (USA and Canada); Golf Sportsvan from MY
2015 |
- Low pressure side Refrigerant Circuits Adapter Set 1 - Adapter
12 -VAS6338/12-
- High pressure side Refrigerant Circuits Adapter Set 1 - Adapter
3 -VAS6338/3-
|
- Remove the dryer bag / cartridge and close the receiver/dryer.
- Install a new dryer bag / cartridge after flushing.
- If the condenser by Showa is installed, leave the receiver/dryer
installed and flush the refrigerant circuit.
- Install a new receiver/dryer after flushing.
|
- Replace the expansion valve with the Refrigerant Circuits
Adapter Set 1 - Adapter 38 -VAS6338/38- (or a drilled open expansion
valve)
- Install a new expansion valve after flushing.
|
Golf MY 1998; Golf Wagon MY 1998; Vento MY 1999; New Beetle MY 1999; New
Beetle Cabrio MY 2003; Bora MY 1999;
| Golf from MY 1998;
Golf Wagon from MY 1998; Vento from MY 1999; New Beetle from MY 1999;
New Beetle Convertible from MY 2003; Bora from MY 1999 |
- Low pressure side Refrigerant Circuits Adapter Set 1 - Adapter 7
-VAS6338/7-
- High pressure side Refrigerant Circuits Adapter Set 1 - Adapter
2 -VAS6338/2-
|
- Remove receiver/dryer and bridge coolant pipes.
- Connect with two Refrigerant Circuits Adapter Set 1 - Adapter 2
-VAS6338/2- and with Refrigerant Circuits Adapter Set 1 - Hose 31
-VAS6338/31-.
- Install a new receiver/dryer after flushing.
|
- Replace the expansion valve with the Refrigerant Circuits
Adapter Set 1 - Adapter 19 -VAS6338/19- (or a drilled open expansion
valve)
- Install a new expansion valve after flushing.
|
Phaeton MY 2003
| Vehicle |
Required adapters for
refrigerant pipes to A/C compressor |
Required adapters for
refrigerant pipes to receiver/dryer/reservoir |
Miscellaneous |
| Phaeton from MY 2003 |
- Low pressure side Refrigerant Circuits Adapter Set 1 - Adapter
12 -VAS6338/12-
- High pressure side for 12-, 8- and 6-cylinder gasoline engines,
Refrigerant Circuits Adapter Set 1 - Adapter 2 -VAS6338/2-; high
pressure side for 10-and 6-cylinder diesel engines, Refrigerant
Circuits Adapter Set 1 - Adapter 3 -VAS6338/3-
|
- Remove the reservoir (dryer) and bridge coolant pipes.
- Connect with two Refrigerant Circuits Adapter Set 1 - Adapter 6
-VAS6338/6- and with Refrigerant Circuits Adapter Set 1 - Hose 31
-VAS6338/31-.
- Install a new reservoir after flushing.
|
- Restrictor removed and refrigerant pipe reconnected.
- Install a new restrictor after flushing.
|
Passat MY 1997
| Vehicle |
Required adapters for
refrigerant pipes to A/C compressor |
Required adapters for
refrigerant pipes to receiver/dryer/reservoir |
Miscellaneous |
| Passat from MY 1997
through 09/2000 |
- A/C Adapter Set - Adapter 7 -VAG1785/7-
- A/C Adapter Set - Adapter 8 -VAG1785/8-
- Low pressure side Refrigerant Circuits Adapter Set 1 - Adapter
12 -VAS6338/12-
- High pressure side Refrigerant Circuits Adapter Set 1 - Adapter
2 -VAS6338/2-
|
There are two different
container versions.
- Remove reservoir and bridge coolant pipes.
- Connect Refrigerant Circuits Adapter Set 1 - Adapter 9
-VAS6338/9- and Refrigerant Circuits Adapter Set 1 - Adapter 8 -VAG
1785/8- or Refrigerant Circuits Adapter Set 1 - Adapter 10
-VAS6338/10- with Refrigerant Circuits Adapter Set 1 - Hose 31
-VAS6338/31-.
- Install a new reservoir after flushing.
|
- Restrictor removed and refrigerant line reconnected.
- Install a new restrictor after flushing.
|
| Passat from MY 1997, from
10/2000 |
- A/C Adapter Set - Adapter 7 -VAG1785/7-
- A/C Adapter Set - Adapter 8 -VAG1785/8-
- Low pressure side Refrigerant Circuits Adapter Set 1 - Adapter
12 -VAS6338/12-
- High pressure side Refrigerant Circuits Adapter Set 1 - Adapter
2 -VAS6338/2-
|
- Remove reservoir and bridge coolant pipes.
- Connect with two Refrigerant Circuits Adapter Set 1 - Adapter 10
-VAS6338/10- and with Refrigerant Circuits Adapter Set 1 - Hose 31
-VAS6338/31-.
- Install a new reservoir after flushing.
|
- Restrictor removed and refrigerant line reconnected.
- Install a new restrictor after flushing.
|
Passat MY 2006; Passat CC MY 2009; CC MY 2010; Passat MY 2011; CC FL
| Vehicle |
Required adapters for
refrigerant pipes to A/C compressor |
Required adapters for
refrigerant pipes to receiver/dryer/reservoir |
Miscellaneous |
| Passat from MY 2006; Passat CC
from MY 2009; CC from MY 2010; Passat from MY 2011; CC FL |
- Low pressure side Refrigerant Circuits Adapter Set 1 - Adapter
12 -VAS6338/12-
- High pressure side Refrigerant Circuits Adapter Set 1 - Adapter
3 -VAS6338/3-
|
- Remove dryer cartridge and seal receiver/dryer.
- Install a new dryer cartridge after flushing.
- If the condenser by Showa is installed, leave the receiver/dryer
installed and flush the refrigerant circuit.
- Install a new receiver/dryer after flushing.
|
- Replace the expansion valve with the Refrigerant Circuits
Adapter Set 1 - Adapter 18 -VAS6338/18- (or a drilled open expansion
valve )
- Install a new expansion valve after flushing.
|
Passat MY 2015; Passat Wagon MY 2015
Note
The Passat 2015 and Passat Wagon 2015 with a Biturbo engine are not flushed.
The amount of work to remove the expansion valve is too excessive. If there is
A/C compressor damage, check whether there are shavings in the condenser and
whether there are shavings on the condenser output. If there are shavings on the
input and not on the output, then only the condenser and A/C Compressor need to
be replaced.
| Vehicle |
Required adapters for
refrigerant pipes to A/C compressor |
Required adapters for
refrigerant pipes to receiver/dryer |
Miscellaneous |
| Passat from MY 2015; Passat
Wagon from MY 2015 |
- Low pressure side Refrigerant Circuits Adapter Set 1 - Adapter
12 -VAS6338/12-
- High pressure side Refrigerant Circuits Adapter Set 1 - Adapter
3 -VAS6338/3-
|
- Remove the dryer bag / cartridge and close the receiver/dryer.
- Install a new dryer bag / cartridge after flushing.
|
- Replace the expansion valve with the Refrigerant Circuits
Adapter Set 1 - Adapter 18 -VAS6338/18- (or a drilled open expansion
valve)
- Install a new expansion valve after flushing.
|
Sharan MY 1996
Note
On vehicles with second evaporator (Sharan), the front and rear refrigerant
circuits must be flushed individually. Seal the front refrigerant circuit using
A/C Adapter Set - Adapter 1 -VAG1785/1-, A/C Adapter Set - Adapter 3 -1785/3-
and Closure Caps VAS6338/30.
| Vehicle |
Required adapters for
refrigerant pipes to A/C compressor |
Required adapters for
refrigerant pipes to receiver/dryer and second Evaporator |
Miscellaneous |
| Sharan from MY 1996
through 05/2000
|
- Low pressure side Refrigerant Circuits Adapter Set 1 - Adapter 7
-VAS6338/7-
- High pressure side Refrigerant Circuits Adapter Set 1 - Adapter
2 -VAS6338/2-
- or Refrigerant Circuits Adapter Set 1 - Adapter 14 -VAS6338/14-
|
- Remove the receiver/dryer and connect the refrigerant pipes to
the Refrigerant Circuits Adapter Set 1 - Adapter 37 -VAS6338/37-
- Install a new receiver/dryer (dryer) after flushing.
- Low pressure line for second evaporator Refrigerant Circuits
Adapter Set 1 - Adapter 7 -VAG1785/7-
- High pressure line for second evaporator Refrigerant Circuits
Adapter Set 1 - Adapter 5 -VAG1785/5-
- A/C Adapter Set - Adapter 3 -VAG1785/3- with Closure Cap
-VAS6338/30- to seal the front refrigerant circuit.
- A/C Adapter Set - Adapter 1 -VAG1785/1- with Closure Cap
-VAS6338/30- to seal the front refrigerant circuit.
|
- Replace the front and rear expansion valve with the Refrigerant
Circuits Adapter Set 2 - Adapter 35 -VAS6338/35- (or a drilled open
expansion valve )
- Install a new expansion valve after flushing.
|
| Sharan from MY 1996 from June
2000 |
- Low pressure side Refrigerant Circuits Adapter Set 1 - Adapter 7
-VAS6338/7-
- High pressure side Refrigerant Circuits Adapter Set 1 - Adapter
2 -VAS6338/2-
|
- Remove dryer cartridge and seal receiver/dryer.
- Install a new dryer cartridge after flushing.
- Low pressure line for second evaporator Refrigerant Circuits
Adapter Set 1 - Adapter 7 -VAG1785/7-
- High pressure line for second evaporator Refrigerant Circuits
Adapter Set 1 - Adapter 5 -VAG1785/5-
- A/C Adapter Set - Adapter 3 -VAG1785/3- with Closure Cap
-VAS6338/30- to seal the front refrigerant circuit.
- A/C Adapter Set - Adapter 1 -VAG1785/1- with Closure Cap
-VAS6338/30- to seal the front refrigerant circuit.
|
- Replace the front and rear expansion valve with the Refrigerant
Circuits Adapter Set 2 - Adapter 35 -VAS6338/35- (or a drilled open
expansion valve)
- Install a new expansion valve after flushing.
|
Sharan MY 2011 and Sharan MY 2016
Note
On vehicles with second evaporator (Sharan), the front and rear refrigerant
circuits must be flushed individually. Seal the front refrigerant circuit using
A/C Adapter Set - Adapter 1 -VAG1785/1-, A/C Adapter Set - Adapter 3 -1785/3-
and Closure Caps VAS6338/30.
| Vehicle |
Required adapters for
refrigerant pipes to A/C compressor |
Required adapters for
refrigerant pipes to receiver/dryer and second Evaporator |
Miscellaneous |
| Sharan from MY 2011 and Sharan
from MY 2016 |
- Low pressure side Refrigerant Circuits Adapter Set 1 - Adapter
12 -VAS6338/12-
- High pressure side Refrigerant Circuits Adapter Set 1 - Adapter
3 -VAS6338/3-
|
- Remove dryer cartridge and seal receiver/dryer.
- Install a new dryer cartridge after flushing.
- Low pressure line for second Evaporator Refrigerant Circuits
Adapter Set 1 - Adapter 3 -VAS6338/3-
- High pressure line for second Evaporator Refrigerant Circuits
Adapter Set 1 - Adapter 4 -VAS6338/4-
- Loosen the refrigerant lines to the second evaporator just
enough so that the adapter can be installed without deforming the
refrigerant lines.
- Refrigerant Circuits Adapter Set 1 - Adapter 5 -VAS6338/5- for
the front refrigerant circuit.
- Refrigerant Circuits Adapter Set 1 - Adapter 11 -VAS6338/11- for
the front refrigerant circuit.
|
- Replace the front expansion valve with the Refrigerant Circuits
Adapter Set 1 - Adapter 18 -VAS6338/18- (or a drilled open expansion
valve
- Replace the rear expansion valve with the Refrigerant Circuits
Adapter Set 2 - Adapter 33 -VAS6338/33- (or a drilled open expansion
valve
- Install a new expansion valve after flushing.
|
Touareg MY 2003; Touareg MY 2010; Touareg MY 2015; Touareg MY Hybrid 2010
Note
On vehicles with second evaporator (Touareg), the front and rear refrigerant
circuits must be flushed individually. Seal the front refrigerant circuit using
Refrigerant Circuits Adapter Set 1 - Adapter 5 -VAS6338/5- and Refrigerant
Circuits Adapter Set 1 - Adapter 11 -VAS6338/11-.
| Vehicle |
Required adapters for
refrigerant pipes to A/C compressor |
Required adapters for
refrigerant pipes to receiver/dryer and second Evaporator |
Miscellaneous |
| Touareg from MY 2003
through VIN 50000 |
- Low pressure side Refrigerant Circuits Adapter Set 1 - Adapter
12 -VAS6338/12-
- High pressure side Refrigerant Circuits Adapter Set 1 - Adapter
2 -VAS6338/2-
- Engine code BJN 6.0L through VIN 20000 to high pressure side
Refrigerant Circuits Adapter Set 1 - Adapter 3 -VAS6338/3-.
|
- Remove dryer cartridge and seal receiver/dryer.
- Install a new dryer cartridge after flushing.
- Low pressure line for second Evaporator Refrigerant Circuits
Adapter Set 1 - Adapter 3 -VAS6338/3-
- High pressure line for second Evaporator Refrigerant Circuits
Adapter Set 1 - Adapter 4 -VAS6338/4-
- Refrigerant Circuits Adapter Set 1 - Adapter 5 -VAS6338/5- for
the front refrigerant circuit.
- Refrigerant Circuits Adapter Set 1 - Adapter 11 -VAS6338/11- for
the front refrigerant circuit.
|
- Replace the front expansion valve with the Refrigerant Circuits
Adapter Set 1 - Adapter 17 -VAS6338/17- (or a drilled open expansion
valve)
- Install a new expansion valve after flushing.
- Drill a hole for the expansion valve on the second evaporator.
- Install a new expansion valve after flushing.
|
| Touareg from MY 2003 from VIN
50001; Touareg from MY 2010; Touareg MY 2015; Touareg Hybrid from MY
2010 |
- Low pressure side Refrigerant Circuits Adapter Set 1 - Adapter
12 -VAS6338/12-
- High pressure side Refrigerant Circuits Adapter Set 1 - Adapter
2 -VAS6338/2- or Refrigerant Circuits Adapter Set 1 - Adapter 3
-VAS6338/3-
- Electrically-driven A/C compressor Refrigerant Circuits Adapter
Set - Adapter 40 -VAS6338/40- and Refrigerant Circuits Adapter Set -
Adapter 41 -VAS6338/41-
|
- Remove dryer cartridge and seal receiver/dryer.
- Install a new dryer cartridge after flushing.
- Low pressure line for second Evaporator Refrigerant Circuits
Adapter Set 1 - Adapter 3 -VAS6338/3-
- High pressure line for second Evaporator Refrigerant Circuits
Adapter Set 1 - Adapter 4 -VAS6338/4-
- Refrigerant Circuits Adapter Set 1 - Adapter 5 -VAS6338/5- for
the front refrigerant circuit.
- Refrigerant Circuits Adapter Set 1 - Adapter 11 -VAS6338/11- for
the front refrigerant circuit.
|
- Replace the front and rear expansion valve with the Refrigerant
Circuits Adapter Set 1 - Adapter 17 -VAS6338/17- or Refrigerant
Circuits Adapter Set 2 - Adapter 33 -VAS6338/33- (or a drilled open
expansion valve)
- Install new expansion valves after flushing.
|
Transporter MY 1991
Note
On vehicles with second evaporator, the front and rear refrigerant circuits
must be flushed individually. Seal the front refrigerant circuit using
Refrigerant Circuits Adapter Set 1 - Adapter 5 -VAS6338/5- and Refrigerant
Circuits Adapter Set 1 - Adapter 11 -VAS6338/11-.
| Vehicle |
Required adapters for
refrigerant pipes to A/C compressor |
Required adapters for
refrigerant pipes to receiver/dryer and second Evaporator |
Miscellaneous |
| Transporter from MY 1991
through 2012 1995 |
- A/C compressor D0 820 805 B and 701 820 805 Q Refrigerant
Circuits Adapter Set 2 - Adapter 54 -VAS6338/54-
- On vehicles with auxiliary evaporator on the roof, the
Refrigerant Circuits Adapter Set 2 - Adapter 51 -VAS6338/51- and
Refrigerant Circuits Adapter Set 2 - Adapter 52 -VAS6338/52- should
be used.
|
- For vehicles on which the receiver/dryer is mounted below the
condenser, it may be flushed.
- On the other versions, the receiver/dryer should be removed.
- Refrigerant Circuits Adapter Set 1 - Adapter 20 -VAS6338/20- for
receiver/dryer.
- Refrigerant Circuits Adapter Set 1 - Adapter 29 -VAS6338/29- for
receiver/dryer.
- Refrigerant Circuits Adapter Set 1 - Adapter 26 -VAS6338/26- and
with Closure Cap -VAS6338/30- to seal the front refrigerant circuit
- Refrigerant Circuits Adapter Set 1 - Adapter 27 -VAS6338/27- and
with Closure Cap -VAS6338/30- to seal the front refrigerant circuit
- Refrigerant Circuits Adapter Set 2 - Adapter 57 -VAS6338/57- for
refrigerant line of second evaporator
- Refrigerant Circuits Adapter Set 2 - Adapter 58 -VAS6338/58- for
refrigerant line of second evaporator
- Install a new receiver/dryer after flushing.
|
- Replace the front and rear expansion valve with the Refrigerant
Circuits Adapter Set 2 - Adapter 55 -VAS6338/55- (or a drilled open
expansion valve)
- Install a new expansion valve after flushing.
|
| Transporter from MY 91 as of 01
1996 |
- A/C compressor 7D0 820 805 E Refrigerant Circuits Adapter Set 2
- Adapter 53 -VAS6338/53-
- A/C compressor 7D0 820 805 H low pressure side Refrigerant
Circuits Adapter Set 1 - Adapter 7 -VAS6338/7-
- High pressure side Refrigerant Circuits Adapter Set 1 - Adapter
2 -VAS6338/2-
- On vehicles with auxiliary evaporator on the roof, the
Refrigerant Circuits Adapter Set 2 - Adapter 51 -VAS6338/51- and
Refrigerant Circuits Adapter Set 2 - Adapter 52 -VAS6338/52- should
be used.
|
- For vehicles on which the receiver/dryer is mounted below the
condenser, it may be flushed.
- On the other versions, the receiver/dryer should be removed.
- Refrigerant Circuits Adapter Set 1 - Adapter 20 -VAS6338/20- for
receiver/dryer.
- Refrigerant Circuits Adapter Set 1 - Adapter 29 -VAS6338/29- for
receiver/dryer.
- Refrigerant Circuits Adapter Set 1 - Adapter 26 -VAS6338/26- and
with Closure Cap -VAS6338/30- to seal the front refrigerant circuit.
- Refrigerant Circuits Adapter Set 1 - Adapter 27 -VAS6338/27- and
with Closure Cap -VAS6338/30- to seal the front refrigerant circuit.
- Refrigerant Circuits Adapter Set 2 - Adapter 57 -VAS6338/57- for
refrigerant line of second evaporator.
- Refrigerant Circuits Adapter Set 2 - Adapter 58 -VAS6338/58- for
refrigerant line of second evaporator.
- Install a new receiver/dryer after flushing.
|
- Replace the front and rear expansion valve with the Refrigerant
Circuits Adapter Set 2 - Adapter 55 -VAS6338/55- (or a drilled open
expansion valve)
- Install a new expansion valve after flushing.
|
Transporter MY 2004
Note
On vehicles with second evaporator, the front and rear refrigerant circuits
must be flushed individually. Seal the front refrigerant circuit using
Refrigerant Circuits Adapter Set 1 - Adapter 5 -VAS6338/5- and Refrigerant
Circuits Adapter Set 1 - Adapter 11 -VAS6338/11-.
| Vehicle |
Required adapters for
refrigerant pipes to A/C compressor |
Required adapters for
refrigerant pipes to receiver/dryer and second Evaporator |
Miscellaneous |
| Transporter 7H from MY
2004 |
- A/C compressor 7H0 820 805 E low pressure side Refrigerant
Circuits Adapter Set 1 - Adapter 12 -VAS6338/12-, high pressure side
Refrigerant Circuits Adapter Set 1 - Adapter 3 -VAS6338/3-
- A/C compressor 7H0 820 803 C low pressure side Refrigerant
Circuits Adapter Set 1 - Adapter 7 -VAS6338/7-, high pressure side
Refrigerant Circuits Adapter Set 1 - Adapter 2 -VAS6338/2-
|
- Remove dryer cartridge and seal receiver/dryer.
- Install a new dryer cartridge after flushing.
- Refrigerant Circuits Adapter Set 1 - Adapter 5 -VAS6338/5- for
the front refrigerant circuit.
- Refrigerant Circuits Adapter Set 1 - Adapter 11 -VAS6338/11- for
the front refrigerant circuit.
- Low pressure line for second Evaporator Refrigerant Circuits
Adapter Set 1 - Adapter 3 -VAS6338/3-
- High pressure line for second Evaporator Refrigerant Circuits
Adapter Set 1 - Adapter 4 -VAS6338/4-
|
- Through VIN 20000, drill out the expansion valve.
- From VIN 20001, replace the front expansion valve with
Refrigerant Circuits Adapter Set 2 - Adapter 56 -VAS6338/56-
- Install a new expansion valve after flushing.
- Drill a hole for the expansion valve Replace the evaporator with
Refrigerant Circuits Adapter Set 2 - Adapter 33 -VAS6338/33-.
- Install a new expansion valve after flushing.
|
| Transporter 7J from MY 2004 |
- A/C compressor 7H0 820 805 E low pressure side Refrigerant
Circuits Adapter Set 1 - Adapter 12 -VAS6338/12-, high pressure side
Refrigerant Circuits Adapter Set 1 - Adapter 3 -VAS6338/3-
- A/C compressor 7H0 820 803 C low pressure side Refrigerant
Circuits Adapter Set 1 - Adapter 7 -VAS6338/7-, high pressure side
Refrigerant Circuits Adapter Set 1 - Adapter 2 -VAS6338/2-
- A/C compressor 7H0 820 805 D low pressure side Refrigerant
Circuits Adapter Set 2 - Adapter 52 -VAS6338/12-, high pressure side
Refrigerant Circuits Adapter Set 2 - Adapter 51 -VAS6338/51-
|
- Remove dryer cartridge and seal receiver/dryer.
- Install a new dryer cartridge after flushing.
- Refrigerant Circuits Adapter Set 1 - Adapter 5 -VAS6338/5- for
the front refrigerant circuit.
- Refrigerant Circuits Adapter Set 1 - Adapter 11 -VAS6338/11- for
the front refrigerant circuit.
- Low pressure line for second Evaporator Refrigerant Circuits
Adapter Set 1 - Adapter 3 -VAS6338/3-
- High pressure line for second Evaporator Refrigerant Circuits
Adapter Set 1 - Adapter 4 -VAS6338/4-
|
- Through VIN 5000, drill out the expansion valve.
- From VIN 5001, replace the front expansion valve with
Refrigerant Circuits Adapter Set 2 - Adapter 56 -VAS6338/56-.
- Install a new expansion valve after flushing.
- Drill a hole for the expansion valve Replace the evaporator with
Refrigerant Circuits Adapter Set 2 - Adapter 56 -VAS6338/56-.
- Install a new expansion valve after flushing.
|
Transporter MY 2010; Multivan MY 2010; California MY 2010; Caravelle MY 2010
Note
On vehicles with second evaporator, the front and rear refrigerant circuits
must be flushed individually. Seal the front refrigerant circuit using
Refrigerant Circuits Adapter Set 1 - Adapter 5 -VAS6338/5- and Refrigerant
Circuits Adapter Set 1 - Adapter 11 -VAS6338/11-.
| Vehicle |
Required adapters for
refrigerant pipes to A/C compressor |
Required adapters for
refrigerant pipes to receiver/dryer and second Evaporator |
Miscellaneous |
| Transporter from MY 2010;
Multivan from MY 2010; California from MY 2010; Caravelle from MY 2010 |
- Low pressure side Refrigerant Circuits Adapter Set 1 - Adapter
12 -VAS6338/12-
- High pressure side Refrigerant Circuits Adapter Set 1 - Adapter
3 -VAS6338/3-
|
- Remove dryer cartridge and seal receiver/dryer.
- Install a new dryer cartridge after flushing.
- Refrigerant Circuits Adapter Set 1 - Adapter 5 -VAS6338/5- for
the front refrigerant circuit.
- Refrigerant Circuits Adapter Set 1 - Adapter 11 -VAS6338/11- for
the front refrigerant circuit.
- Low pressure line for second Evaporator Refrigerant Circuits
Adapter Set 1 - Adapter 3 -VAS6338/3-
- High pressure line for second Evaporator Refrigerant Circuits
Adapter Set 1 - Adapter 4 -VAS6338/4-
|
- Replace the expansion valve with the Refrigerant Circuits
Adapter Set 2 - Adapter 56 -VAS6338/56- (or a drilled open expansion
valve )
- Remove the expansion valve for the rear evaporator and drill
open .
- Install a new expansion valve after flushing.
|
Crafter 2006; LT 2 from MY 1997
Note
On vehicles with second evaporator, the front and rear refrigerant circuits
must be flushed individually. Seal the front refrigerant circuit using
Refrigerant Circuits Adapter Set 1 - Adapter 5 -VAS6338/5- and Refrigerant
Circuits Adapter Set 1 - Adapter 11 -VAS6338/11-.
| Vehicle |
Required adapters for
refrigerant pipes to A/C compressor |
Required adapters for
refrigerant pipes to receiver/dryer and second Evaporator |
Miscellaneous |
| Crafter from MY 2006 |
- A/C compressor 2E0 820 803 A low pressure side Refrigerant
Circuits Adapter Set 1 - Adapter 12 -VAS6338/12-, high pressure side
Refrigerant Circuits Adapter Set 1 - Adapter 3 -VAS6338/3-
- A/C compressor 2E0 820 805 low pressure side Refrigerant
Circuits Adapter Set 1 - Adapter 7 -VAS6338/7-, high pressure side
Refrigerant Circuits Adapter Set 1 - Adapter 3 -VAS6338/3-
|
Receiver/Dryer
- May be flushed.
- Install a new receiver/dryer after flushing.
- Refrigerant Circuits Adapter Set 1 - Adapter 5 -VAS6338/5- for
the front refrigerant circuit.
- Refrigerant Circuits Adapter Set 1 - Adapter 11 -VAS6338/11- for
the front refrigerant circuit.
- Low pressure line for second Evaporator Refrigerant Circuits
Adapter Set 1 - Adapter 3 -VAS6338/3-
- High pressure line for second Evaporator Refrigerant Circuits
Adapter Set 1 - Adapter 4 -VAS6338/4-
|
- Drill a hole for the expansion valve
- Install a new expansion valve after flushing.
|
| LT 2 from MY 1997 |
- Low pressure side Refrigerant Circuits Adapter Set 1 - Adapter 7
-VAS6338/7-
- High pressure side Refrigerant Circuits Adapter Set 1 - Adapter
2 -VAS6338/2-
- Refrigerant Circuits Adapter Set 1 - Adapter 20 -VAS6338/20-
|
- Remove receiver/dryer and bridge coolant pipes.
- Connect with two Refrigerant Circuits Adapter Set 1 - Adapter 29
-VAS6338/10- and with Refrigerant Circuits Adapter Set 1 - Hose 31
-VAS6338/31-.
- Install a new receiver/dryer after flushing.
|
- Replace the expansion valve with the Refrigerant Circuits
Adapter Set 2 - Adapter 56 -VAS6338/56- (or a drilled open expansion
valve)
- Install a new expansion valve after flushing.
|
Amarok MY 2011
| Vehicle |
Required adapters for
refrigerant pipes to A/C compressor |
Required adapters for
refrigerant pipes to receiver/dryer |
Miscellaneous |
| Amarok from MY 2011 |
- Low pressure side Refrigerant Circuits Adapter Set 1 - Adapter
12 -VAS6338/12-
- High pressure side Refrigerant Circuits Adapter Set 1 - Adapter
3 -VAS6338/3-
|
- Remove dryer cartridge and seal receiver/dryer.
- Install a new dryer cartridge after flushing.
|
- Replace the expansion valve with the Refrigerant Circuits
Adapter Set 2 - Adapter 33 -VAS6338/33- (or a drilled open expansion
valve)
|
Golf blue e-Motion MY 2009
| Vehicle |
Required adapters for
refrigerant pipes to A/C compressor and on A/C compressor |
Required adapters for
refrigerant pipes to receiver/dryer |
Miscellaneous |
| Golf blue e-Motion from MY 2009 |
- Low pressure side Refrigerant Circuits Adapter Set 1 - Adapter
12 -VAS6338/12-
- High pressure side Refrigerant Circuits Adapter Set 1 - Adapter
3 -VAS6338/3-
- Flush electrically-driven A/C compressor using Refrigerant
Circuits Adapter Set - Adapter 40 -VAS6338/40- and Refrigerant
Circuits Adapter Set - Adapter 41 -VAS6338/41-.
|
- Remove dryer cartridge and seal receiver/dryer.
- Install a new dryer cartridge after flushing.
- Refrigerant Circuits Adapter Set - Shut-Off Valve -VAS6338/42-
|
- Replace the expansion valve with the Refrigerant Circuits
Adapter Set 1 - Adapter 34 -VAS6338/34- (or a drilled open expansion
valve)
- Install a new expansion valve after flushing.
- Remove the High Voltage Battery Heater Core Refrigerant Cut-Off
Valve -N542- and install the Refrigerant Circuits Adapter Set -
Shut-Off Valve -VAS6338/42-.
- Remove the Heater and A/C Unit Refrigerant Cut-Off Valve -N541-
and install the Refrigerant Circuits Adapter Set - Shut-Off Valve
-VAS6338/42-.
- If the Refrigerant Circuits Adapter Set - Shut-Off Valve
-VAS6338/42- is not available, a voltage of 12 V can be applied to
the Cut-Off Valves -N541- und -N542-.
|
eGolf MY 2014 and eGolf MY 2014 with Heat Pump
| Vehicle |
Required adapters for
refrigerant pipes to A/C compressor and on A/C compressor |
Required adapters for
refrigerant pipes to receiver/dryer |
Miscellaneous |
| e-Golf from MY 2014 |
- Low pressure side Refrigerant Circuits Adapter Set 1 - Adapter
12 -VAS6338/12-
- High pressure side Refrigerant Circuits Adapter Set 1 - Adapter
3 -VAS6338/3-
- Flush electrically-driven A/C compressor using Refrigerant
Circuits Adapter Set - Adapter 40 -VAS6338/40- and Refrigerant
Circuits Adapter Set - Adapter 41 -VAS6338/41-.
|
- Remove dryer cartridge and seal receiver/dryer.
- Install a new dryer cartridge after flushing.
|
- Replace the expansion valve with the Refrigerant Circuits
Adapter Set 1 - Adapter 34 -VAS6338/34- (or a drilled open expansion
valve)
- Install a new expansion valve after flushing.
|
| eGolf from MY 2014 with Heat
Pump |
- Low pressure side Refrigerant Circuits Adapter Set 1 - Adapter
12 -VAS6338/12-
- High pressure side Refrigerant Circuits Adapter Set 1 - Adapter
3 -VAS6338/3-
- Flush electrically-driven A/C compressor using Refrigerant
Circuits Adapter Set - Adapter 40 -VAS6338/40- and Refrigerant
Circuits Adapter Set - Adapter 41 -VAS6338/41-.
|
- Remove the reservoir (dryer) and bridge coolant pipes.
- Connect with two Refrigerant Circuits Adapter Set 1 - Adapter 6
-VAS6338/6- and with Refrigerant Circuits Adapter Set 1 - Hose 31
-VAS6338/31-.
- Install a new reservoir after flushing.
|
- Using the Vehicle Diagnostic Tester, then start the "Refrigerant
circuit, charging" function in the "Basic setting".
- Doing so opens the electric valves on the refrigerant circuit.
- Keep the Vehicle Diagnostic Tester connected so that the valves
stay open.
|
Golf Hybrid MY 2014
| Vehicle |
Required adapters for
refrigerant pipes to A/C compressor and on A/C compressor |
Required adapters for
refrigerant pipes to receiver/dryer |
Miscellaneous |
| Golf Hybrid from MY 2014 |
- Low pressure side Refrigerant Circuits Adapter Set 1 - Adapter
12 -VAS6338/12-
- High pressure side Refrigerant Circuits Adapter Set 1 - Adapter
3 -VAS6338/3-
- Flush electrically-driven A/C compressor using Refrigerant
Circuits Adapter Set - Adapter 40 -VAS6338/40- and Refrigerant
Circuits Adapter Set - Adapter 41 -VAS6338/41-.
|
There are two versions of the
receiver/dryer: Refer to the vehicle specific repair manual.
- Receiver/dryer with an installed dryer.
- May be flushed.
- Install a new receiver/dryer after flushing.
- receiver/dryer with dryer bag / cartridge
- Remove the dryer bag / cartridge and close the receiver/dryer.
- Install a new dryer bag / cartridge after flushing.
|
- Replace the expansion valve with the Refrigerant Circuits
Adapter Set 1 - Adapter 38 -VAS 6338/38- (or a drilled open
expansion valve)
- Replace the Heater and A/C Unit Refrigerant Shut-Off Valve
-N541- and High-Voltage Battery Heater Core Refrigerant Shut-Off
Valve -N542- with two Shut-Off Valves -VAS 6338/42-. Refer to the
information found here.
- The restrictor in the refrigerant line to the High-Voltage
Battery Heat Exchanger is removed and drilled out. Refer to the
notes below
|
Note
The refrigerant circuit is flushed in 2 phases for the Golf Hybrid 2014. In
the first flushing cycle the adapter for the heater and a/c unit refrigerant
cut-off valve - N541 is opened and the adapter for the high voltage battery
heater core refrigerant cut-off valve - N542 is closed. From this, the
refrigerant circuit with the evaporator in the Heater and A/C Unit is flushed.
In the second flushing cycle the adapter for the heater and a/c unit refrigerant
cut-off valve - N541 is closed and the adapter for the high voltage battery
heater core refrigerant cut-off valve - N542 is open. From this, the refrigerant
circuit with the evaporator in the high voltage battery heat exchanger is
flushed. Refer to Heating, Ventilation and Air Conditioning, Repair group 87,
System Overview - Refrigerant Circuit (vehicle-specific repair manual).
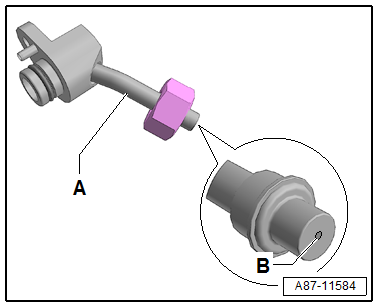
Note
- This illustration shows a refrigerant line -A-
with a permanently installed restrictor -B-
(without a strainer) This refrigerant line is to be drilled open to 5.0 mm
using a suitable drill to flush the refrigerant circuit (an inserted
restrictor is to be removed) and is to be cleaned in the flushing circuit
before installing. The drilled refrigerant line is replaced after flushing.
Refer to the Parts Catalog.
- The diameter of the illustrated restrictor bore
-B- is approximately 0.7 mm. Depending on the version of the
refrigerant line this constriction is either installed fixed in the
refrigerant line or only inserted. For the inserted version a strainer for
flowing deposits may be installed, which can be blocked by the variable
orifice.
Vehicles with a high voltage system
Observe all of the additional warnings for all work performed on vehicles
with the high voltage system.
WARNING
Risk of unintended engine start
The ignition must b ...
Possible Refrigerant Circuit Concerns
Test Requirements
Note
The A/C system is functioning correctly when the air flowing from the
instrument panel vents has a temperature of 70C
or lower.
Sett ...
 Electrically Driven A/C Compressor, Flushing
 Concerns