Volkswagen Tiguan Service and Repair Manual: A/C Compressor
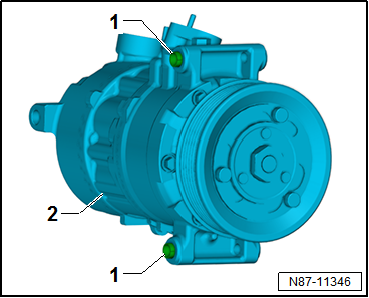
Overview - A/C Compressor Power Unit
- Screw
- 22 +- 1 Nm
- Screw
- 25 +- 2 Nm
- Quantity: 3
- Alignment Sleeve
- Quantity: 2
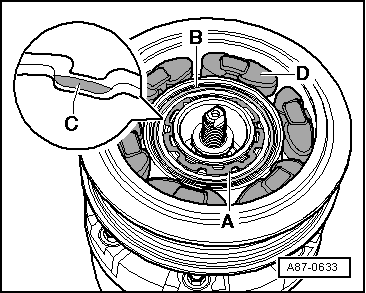
Overview - Belt Pulley
Overview - Belt Pulley, Denso
Note
- This type of ribbed belt pulley is installed on "7SEU17C" A/C compressor.
- Different versions of the ribbed belt pulley may be installed, depending on A/C compressor construction type and engine version. Refer to the Parts Catalog
- Ribbed Belt Pulley, Removing and installing.
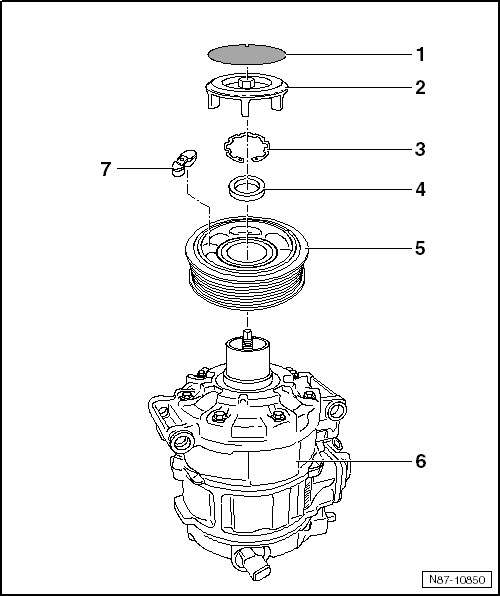
- Cap with Locking Ring
- Remove carefully using a small screwdriver or needle-nose pliers (pay special attention to ribbed belt pulley when doing this)
- Drive Plate
- Circlip
- Always replace
- Install on correct side (flat side toward A/C compressor)
- Spacer
- Ribbed Belt Pulley
- The ribbed belt pulley is made of plastics and is sensitive to impact, be especially careful when handling it.
- Different versions Parts Catalog
- A/C Compressor
- Depending on engine and market version, different versions can be installed Parts Catalog
- Clean A/C compressor flange before sliding on ribbed belt pulley.
- Rubber Element
- Quantity: 6
- Decouples the ribbed belt pulley from the A/C compressor input shaft and dampens vibration and noise
- For installation, lightly coat rubber elements, e.g. with tire mounting paste or a soap solution (as a lubricant)
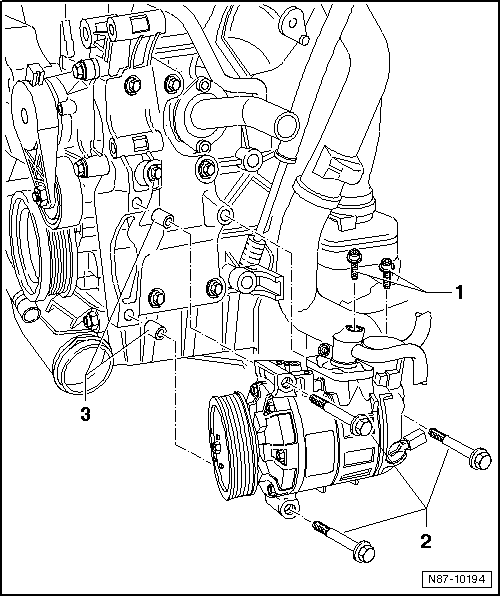
A/C Compressor, Removing and Installing at Bracket
Special tools and workshop equipment required
- Torque Wrench 1331 5-50Nm -VAG1331-
Removing
- Remove the noise insulation under the engine.
- Remove the right front wheel housing liner if necessary.
- Remove the ribbed belt.
- Disconnect the connector -6- from the A/C compressor -1-.
- Remove the bolts -5- and remove the A/C compressor -1-.
Note
Do not loosen the refrigerant pipes on the A/C compressor if only the sub-assembly bracket is being removed.
- Attach the A/C compressor -1- to the body with something suitable, for example, welding wire -2-.
Installing
Install in reverse order of removal. Pay attention to the following for the procedure:
- Thoroughly clean the surfaces on the A/C compressor and bracket.
- Insert the alignment sleeve -1- in the A/C compressor.

Note
Make sure the alignment sleeves are seated correctly and the contact surfaces are clean. Alignment bushings that are installed incorrectly and dirty or damaged contact surfaces can cause alignment irregularities between the A/C compressor and engine. Alignment irregularities over operating time cause damage to the A/C compressor.
Risk of damaging the A/C compressor. Refrigerant oil may accumulate in the compression chamber of the removed A/C compressor.After installing a new A/C compressor or filling with fresh refrigerant oil, turn the A/C compressor 10 times by hand before installing the ribbed belt.
Tightening Specifications
- Refer to → Chapter "Overview - A/C Compressor Power Unit"
Pay Attention to the Following when Starting the Engine for the First Time after Filling the Refrigerant Circuit:
- Follow the information on operating the A/C system after installing the A/C compressor.
A/C Compressor, Removing and Installing
Special tools and workshop equipment required
- Torque Wrench 1331 5-50Nm -VAG1331-
- A/C Service Station
Note
- Perform Guided Fault Finding "A/C compressor first start" whenever a new A/C compressor is installed.
- Do not loosen the refrigerant pipes on the A/C compressor if only the sub-assembly bracket is being removed.
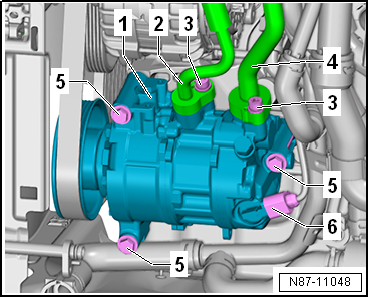
Removing
- Remove the noise insulation under the engine.
- Extract the refrigerant using the A/C Service Station, only then open the refrigerant circuit.
- Depending on the engine installed, remove the charge air hose.
- Remove the ribbed belt.
- Disconnect the connector from the A/C Compressor Regulator Valve -N280-.
Danger or frostbite due to refrigerant coming out under pressure.Frostbite on the skin and other parts of the body is possible.Wear safety gloves.Wear protective eyewear.Extract refrigerant and open the refrigerant circuit immediately.If more than 10 minutes elapse after extracting the refrigerant and the refrigerant circuit was not opened, extract the refrigerant again. Pressure develops in the refrigerant circuit due to evaporation.
- Remove the bolts -1- (22 Nm +- 1 Nm) from the A/C compressor.
- Disconnect the refrigerant lines from the A/C compressor.
- Remove the hex bolts (25 Nm) -2- and the A/C compressor.

Installing
Install in reverse order of removal. Pay attention to the following for the procedure:
- Initiate the "A/C compressor first start" function in Guided Fault Finding.
- Clean the surfaces on the A/C compressor and bracket.
- Insert the alignment bushings -1- in the A/C compressor -2-.
Note
- Alignment bushings that are installed incorrectly and dirty or damaged contact surfaces can cause alignment irregularities between the A/C compressor and engine. Alignment irregularities damage the A/C compressor over time.
- If the A/C compressor is replaced due to certain complaints (for example, internal damage), clean the refrigerant circuit.
- There is an unspecified amount of refrigerant oil in the removed A/C compressor, so therefore pay attention to the information on replacing the A/C compressor.
Pay Attention to the Following when Starting the Engine for the First Time after Filling the Refrigerant Circuit:
- Follow the information on operating the A/C system after installing the A/C compressor.
- Start the engine with the A/C compressor already turned off (indicator lamp button A/C is off) and wait until the idle RPM stabilizes.
- Open the instrument panel vents.
- Select for example the temperature preset "Lo" on the Heater and A/C Controls -EX21-.
- Switch on the A/C compressor (indicator lamp in the A/C button turns on) and let the engine idle for at least 5 minutes.
Note
- The A/C compressor is driven by the ribbed belt pulley (there is no solenoid coupling).
- If the A/C compressor is blocked, the compressor shaft overload protection is activated. The blockage is mostly recognized by deformations/bumps on the ribbed belt pulley. In addition, the blockage can be recognized by the abraded rubber in the area of the ribbed belt pulley.
- The A/C compressor is equipped with a protected oil supply, this prevents A/C compressor damage in the event that the system is empty. This means that approximately 40 to 50 cm3 of refrigerant oil remains in the A/C compressor.
- Only start the engine when the refrigerant circuit is filled.
- Only start the engine if the refrigerant circuit was correctly installed. If, for example, the refrigerant lines are not connected to the A/C compressor and the engine is started and runs, then the A/C compressor may be destroyed by the build-up of internal heat.
- A/C Compressor Regulator Valve -N280- is not activated when the refrigerant circuit is empty and the A/C compressor idles with the engine.
- If it is necessary to start the engine with a discharged refrigerant circuit:
- Refrigerant circuit must be fully assembled.
- At least a quarter of the prescribed refrigerant oil quantity must be in the A/C compressor.
- The engine speed must not exceed 2000 RPM.
- The engine should only run as long as absolutely necessary, maximum 10 minutes.
Tightening Specifications
- Refer to → Chapter "Overview - A/C Compressor Power Unit"
Pressure Relief Valve on A/C Compressor, Checking
Checking
- Function: Protects the refrigerant circuit against excessive pressure
There is a risk of frostbite from the refrigerant. The pressure relief valve drains refrigerant when the engine is running and the refrigerant circuit pressure is too high.Frostbite on the skin and other parts of the body is possible.Wear safety gloves.Wear protective eyewear.Turn the engine off.
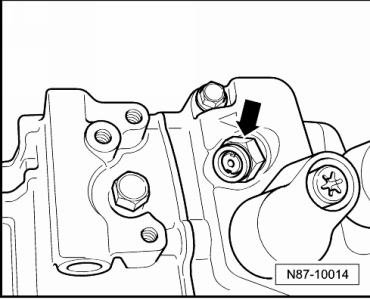
Denso A/C Compressor Relief Valve
- The pressure relief valve -arrow- has operated when refrigerant oil is found in the close vicinity.
- In this case, the vehicle must be taken to a specialized A/C repair facility.
Note
For other A/C compressor manufactures the relief valve is located in a similar place.
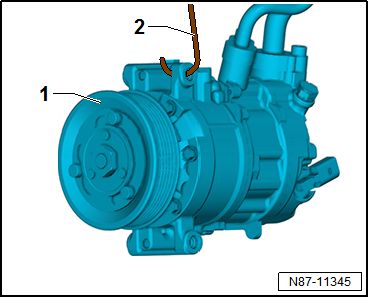
Belt Pulley, Removing and Installing
Belt Pulley, Removing and Installing, Denso
Special tools and workshop equipment required
- Commercially available oil filter band wrench
Removing
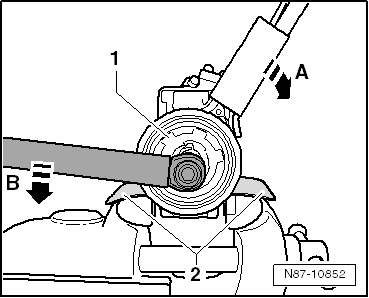
- Carefully remove the cap with locking ring -A- using a small screw driver or needle nose pliers for example. Make sure that the ribbed belt pulley is not damaged in the process.
- Counterhold the drive plate -C- with the ribbed belt pulley -D- using a commercially available strap wrench in direction of -arrow E- and loosen the input shaft -B- (35 +- 5 Nm) in the direction of -arrow F-.
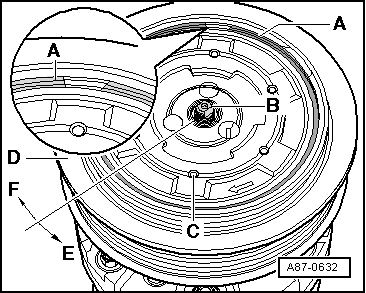
- Remove drive plate -C-.
- Remove the circlip -A-.
- Remove the ribbed belt pulley -B-.
Installing
Note
- Remove locking ring -A-.
- Clean A/C compressor flange before sliding on ribbed belt pulley.
- When installing circlips -A-, note that it cannot be bent open more than is necessary for installation.
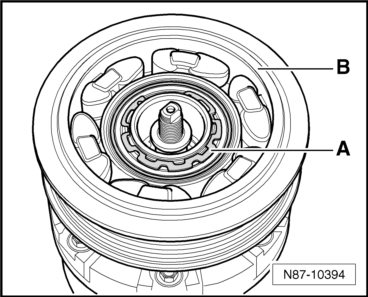
- Install the ribbed belt pulley -B-.
- Insert circlip -A- on correct side, the side with beveled insertion edge -C- faces away from A/C compressor (install flat side facing A/C compressor).
- Insert rubber elements -D- in belt pulley -B- according to illustration.
Note
- When installing the drive plate, coat the rubber element -D- lightly with, for example, tire mounting paste or soap solution (as lubricant).
- Install protective jaws -2- between vise and the A/C compressor in order to avoid damaging the A/C compressor mount.
- Position the drive plate -C- between the rubber elements until they touch the A/C compressor shaft -B-.
- Secure the drive plate -1- with a commercially available strap wrench in the direction of -arrow A- and tighten the driveshaft by turning the torque wrench in the direction of -arrow B- (35 +- 5 Nm).

- Install cap with locking ring.
 Refrigerant Circuit
System Overview - Refrigerant Circuit
Expansion Valve
Function and removal.
Receiver/Dryer with Dryer
Note
Under certain conditions, receiver/dryer with dryer is no longer to be
replace ...
 Adjustment Motors
Temperature Control Door Motor -V68-, Removing and Installing
Special tools and workshop equipment required
Vehicle Diagnostic Tester
Note
The motors were changed starting from 11/04/2013. See th ...
See More:
Volkswagen Tiguan Owners Manual > Instrument cluster: Displays
Fig. 13 In the instrument cluster display:
A: Open engine hood, B: Open rear hatch, C: Open front driver side door, D: Open
rear passenger side door.
Depending on the vehicle model, different information may be shown
in the instrument cluster display ⇒ Fig. 11④ ⇒ Fig. 12④ .
Wa ...
Volkswagen Tiguan Owners Manual
Volkswagen Tiguan Service and Repair Manual
- Body exterior
- Body Interior
- General Paint Information
- Paint
- Brake System
- Suspension, Wheels, Steering
- Wheel and Tire Guide
- Towing Guide
- Wheel and Tire Guide General Information
- Communication
- Electrical Equipment General Information
- Electrical Equipment from 06/2011
- Heating, Ventilation and Air Conditioning
- Refrigerant R134a Servicing
- 6-Speed Manual Transmission 02Q, OBB, and OFB
