Volkswagen Tiguan Service and Repair Manual: Adjustment Motors
Adjuster for Air Distribution Control Doors, Removing and Installing
Removing
- Remove the instrument panel.
- Unclip flexible shaft from adapter for controls.
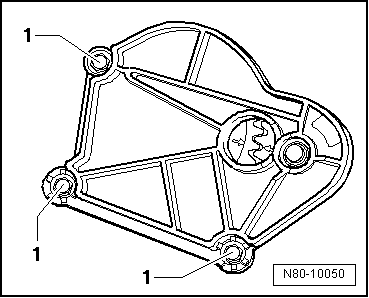
- Unscrew bolts -1- and remove the adjusting unit for the air distribution doors.
Installing
- The arrows on the gears must align.
- Position the adjusting unit for air distribution doors and tighten bolts -1-.

Note
After installing, the function of air distribution doors must be checked.
Temperature Door Adjuster, Removing and Installing
Removing
- Remove the driver footwell trim panel.
- Remove the left footwell vent.
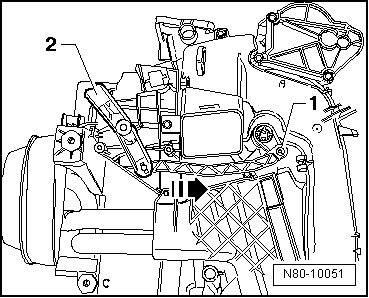
- Unclip the cable at the adjusting unit for temperature door -2-.
- Loosen the locking mechanism -1- and press the temperature control door adjuster in the direction of the -arrow- until it stops.
- Remove the temperature control door adjuster.
Installing
Install in reverse order of removal.
Note
After installing, the function of the temperature control door must be checked. The Temperature knob on heating and ventilation controls must be able to be moved easily and without catching from the "cold" to "warm" position.
Flexible Air Distribution Shaft, Removing and Installing
Removing
- Remove the radio.
- Remove the center instrument panel trim from vehicles without a radio.
- Remove the glove compartment.
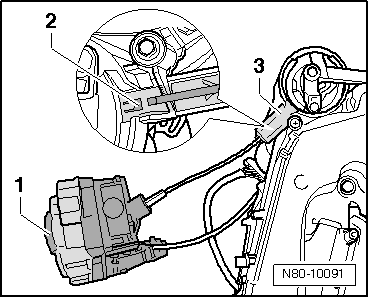
- Move the flexible shaft to the following position:
- Turn the air distribution control knob -1- until the locking mechanism on the shaft -2- is visible in gear reduction -3-.
- Remove the heating and ventilation controls.
- Reach into the center console and push the tab -1- in the direction of the arrow to release it.
- Pull flexible shaft out of the adapter -2-.

Note
When installing the flexible shaft, the adapter and control knobs on the heating and ventilation controls must have a specific position to each other, otherwise it will malfunction.
Installing
- Install in reverse order of removal and note the following:
Check the flexible shaft for the air distribution door adjustment unit:
- Let fresh air blower run on highest speed. The flexible shaft is installed correctly if air flows out of the defroster vents in the "Defrost function" position, but not out of the footwell vents. If this is not the case, remove the flexible shaft from the adapter. Place the heating and ventilation controls onto the adapter and turn the air distribution control 1/2 rotation (180º). Then reconnect the flexible shaft. Repeat the test.
Temperature Control Door Release Cable, Removing and Installing
Removing
- Remove the heating and ventilation controls.
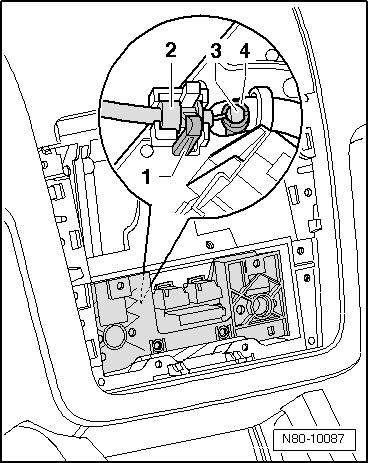
- Reach in the center console and loosen the retainer -1- on the cable grommet -2- and then remove the grommet from the mount.
- Loosen the ball on the cable -3- from the lever -4-.
Remove the driver footwell cover.
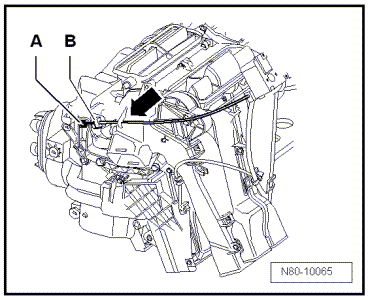
- Unclip the release cable at the temperature control door adjuster -A- and unclip the heater -B-.
Installing
Install in reverse order of removal. When doing this, make sure that release cable lies under the hook -arrow-.
- Check if the temperature control can be moved easily from "cold" to "warm".

Air Routing
The removal and installation is identical to vehicles with an A/C system.
 Heater
Overview - Heater
Temperature Control Door Adjuster
Removing and installing.
Bracket
Cover
Fresh/Recirculated Air Door Motor -V154-
Check using the Vehicle Diagnostic Tester.
Removin ...
 Display Control Head
Display Control Head, Removing and Installing
Removing
Note
The controls consist of two separable housings. Before removing
controls, bring rotary buttons into the following positions:
Heater con ...
See More:
Volkswagen Tiguan Service and Repair Manual > Clear Coats: Two-Part HS Optimum Plus Clear Coat
Definition:
Two-Part HS Optimum Plus Clear Coat -LZK 769 K07 A5-
Product Description
The two-part HS optimum plus clear coat is a VOC compliant high solid clear
coat. Optimal application even under unfavorable booth conditions, for example
low drying temperature.
Properties:
Flexible and effi ...
Volkswagen Tiguan Owners Manual
Volkswagen Tiguan Service and Repair Manual
- Body exterior
- Body Interior
- General Paint Information
- Paint
- Brake System
- Suspension, Wheels, Steering
- Wheel and Tire Guide
- Towing Guide
- Wheel and Tire Guide General Information
- Communication
- Electrical Equipment General Information
- Electrical Equipment from 06/2011
- Heating, Ventilation and Air Conditioning
- Refrigerant R134a Servicing
- 6-Speed Manual Transmission 02Q, OBB, and OFB
