Volkswagen Tiguan Service and Repair Manual: Contact Housings and Connectors, Repairing
Contact Housings and Connectors, Repair Information
Note
- Observe general notes for repairs on the vehicle electrical system.
- Allocation of crimp contacts with correct fit to contact housing is performed according to the part number stamped in on the contact housing. Part numbers of contact housing are listed in conjunction with the respective crimp contacts with correct fit in plate 198 (electrical connecting elements) in Parts Catalog.
- Damaged contact housings must always be replaced.
- New contact housings may be ordered via OTC Kassel.
Contacts in Contact Housing, Repairing
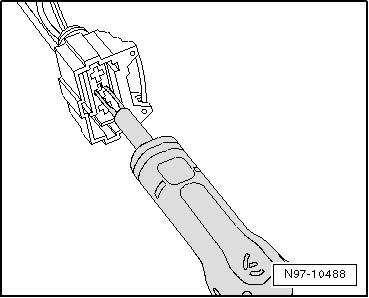
- First, open or release if necessary the secondary lock of the contact housing.
- Release contact (primary lock) using the appropriate release tool.
- Pull contact at single wire out of contact housing.
- Take the yellow repair wire with the correct contact out of the Wiring Harness Repair Set -VAS1978-.
- Free up repair point of vehicle-specific wiring harness (approximately 20 cm to both sides of repair point).
- If required, remove wiring harness wrapping using a folding knife.
- Insert new contact of repair wire into contact housing until it engages.
- Slide a single wire seal onto the repair wire.
Note
When doing this, small diameter of single seal must point toward contact housing.
- Slide single wire seal into contact housing using the correct assembly tool.
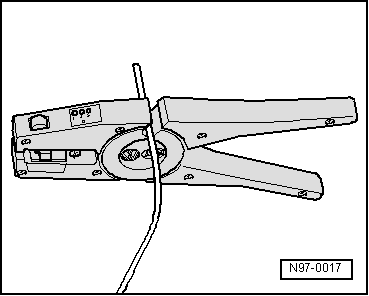
- Shorten the repair wire and the vehicle-specific wiring harness single wire as needed using the Wiring Harness Repair Set - Wire Strippers -VAS1978/3-.

- Strip ends of repair wire and of vehicle-specific single wire using 6 - 7 mm wire stripper.
- Crimp the stripped ends of repair wire and single wire of vehicle-specific wiring harness using crimp pliers and a crimp connection as described in chapter "Wire break with single repair point".

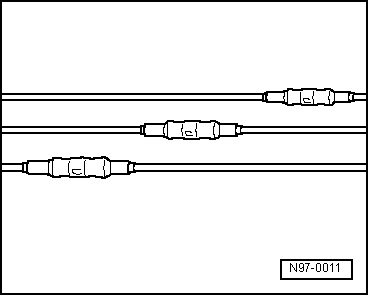
Note
- Make sure that crimp connections do not lie directly next to each other when several wires need to be repaired. Arrange the crimp connectors at a slight offset so that the circumference of the wiring harness does not become too large.
- In the event the repair point was previous taped, this point must be taped anew with yellow insulating tape after repairs.
- Secure the repaired wiring harness if necessary with a cable tie to prevent flapping noises while driving.
Single Wire Seals, Installing
Note
- Single wire seals prevent the penetration of water and dirt into the contact housing. They are installed, for example, in the engine compartment and must be reinstalled after a repair.
- Single wire seal is crimped on at the factory together with contact on the wire, this is not the case for repair wires. Single wire seal must be slid onto wire first before crimping the repair wire.
- Single wire seals must always fit with the repair wire cross-section. Outer circumference of single wire seal is aligned according to chamber circumference of the contact housing. Perform assembly using only the assembly tool with correct fit.
Assembling Single Wire Seal
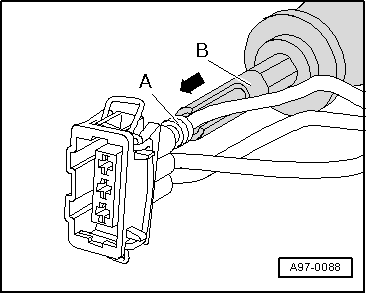
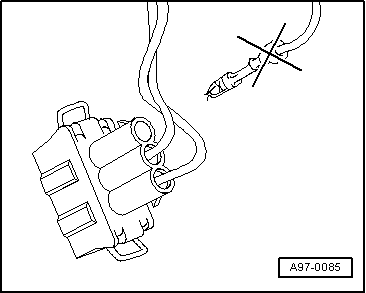
- Release contact lock using assembly tool with correct fit -A- and then pull wire with single wire seal toward rear -arrow- out of contact housing.
- Cut off the old contact with single wire seal from the vehicle-specific wiring harness.
- Slide repair wire with new contact into corresponding chamber of contact housing until it engages.
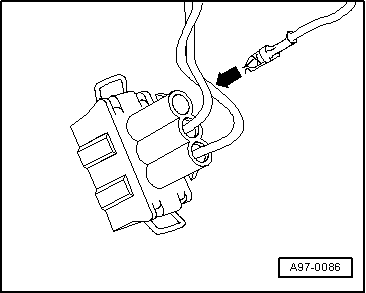
- Put single wire seal -A- onto free end of repair wire.
Note
When doing this, small diameter of single wire seal must point toward contact housing.
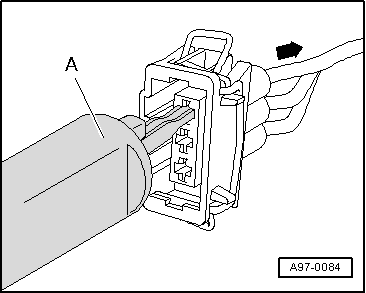
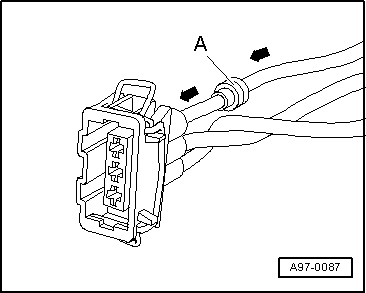
- Slide single wire seal -A- onto repair wire up to the contact housing.
- Slide single wire seal -A- into contact housing until it stops using the corresponding assembly tool -B-.

- Shorten the repair wire and the vehicle-specific wiring harness single wire as needed using the Wiring Harness Repair Set - Wire Strippers -VAS1978/3-.
- Crimp the stripped ends of repair wire and single wire of vehicle-specific wiring harness using crimp pliers and a crimp connection as described in chapter "Wire break with single repair point".
Contact Housings, Repairing Wire Terminals
Note
- For technical reasons, the contact housing for the wire terminals can be supplied only with the contacts pushed in.
- These contacts can be removed at every other contact housing in the event they are not required.
- These contacts can be removed at every other contact housing in the event they are not required.
- Repair wires which have already been equipped with corresponding contacts crimped on are available. Refer to Parts Catalog.

 Antenna Wires, Repairing
Aerial Cable Repair Set -VAS6720-
Special tools and workshop equipment required
Repair Set, Aerial Cable -VAS6720-
Checking the Antenna Wire.
Replacing the Tool Head.
Cutting the Antenna Wire.
R ...
 Contact Housings, Releasing and Disassembling
Releasing and Disassembly Contact Housings, General Information
Note
Observe general notes for repairs on the vehicle electrical system.
Always use the release tools intended for the releasing proc ...
See More:
Volkswagen Tiguan Service and Repair Manual > Sunroof: Front and Rear Glass Panel Height, Adjusting
Note
Adjust the front glass sunroof panel only on the front edge and the
rear glass sunroof panel on the rear edge.
To achieve the best possible exterior optical characteristics, make
sure that the adjustment on left and right sides is performed as evenly (symmetrically)
as possible.
Heigh ...
Volkswagen Tiguan Owners Manual
Volkswagen Tiguan Service and Repair Manual
- Body exterior
- Body Interior
- General Paint Information
- Paint
- Brake System
- Suspension, Wheels, Steering
- Wheel and Tire Guide
- Towing Guide
- Wheel and Tire Guide General Information
- Communication
- Electrical Equipment General Information
- Electrical Equipment from 06/2011
- Heating, Ventilation and Air Conditioning
- Refrigerant R134a Servicing
- 6-Speed Manual Transmission 02Q, OBB, and OFB
