Volkswagen Tiguan Service and Repair Manual: Subframe, Servicing, through 05/2012
Special tools and workshop equipment required
- Tensioning Strap -T10038-
- Locating Pins -T10096-
- Hydraulic Press - Rear Subframe Bushing Tool Kit -T10263-
- Engine and Gearbox Jack -VAS6931-
- Hydraulic Press -VAS6178- with Bearing Installer - Wheel Hub/Bearing Kit- Pressure Head -T10205/13-
- Pneumatic/Hydraulic Foot Pump -VAS6179-
Front bonded rubber bushing, removing.
Pull in front bonded rubber bushing.
Pulling out rear bonded rubber bushing.
Pulling in rear bonded rubber mounting.
Front Bonded Rubber Bushing, Removing
- Remove rear wheels.
- Remove the coil springs.
- Remove the rear muffler.
- Disconnect the electric connections between the rear axle and the body.
- Remove the stabilizer bar.
- Remove the tie rods.
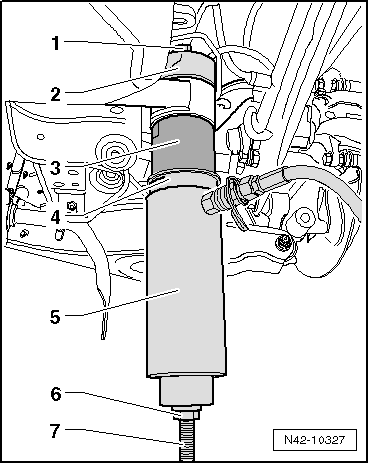
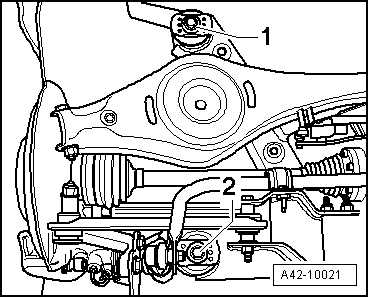
- Remove the clip -1-.
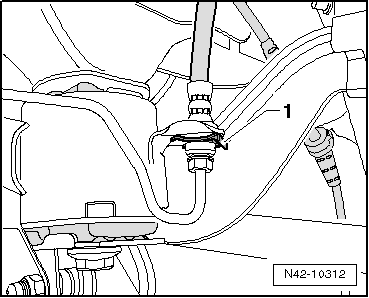
Note
Do not disconnect the brake line.
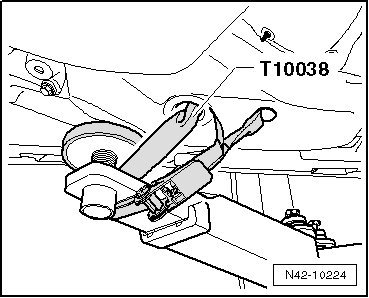
- Now secure vehicle on both sides to lifting arms on hoist with Tensioning Strap -T10038-.

WARNING
If vehicle is not secured, it could slide off of hoist.
- Place the Engine and Gearbox Jack -VAS6931- with Universal Support Plate -VAG1359/2- below subframe and secure with strap.
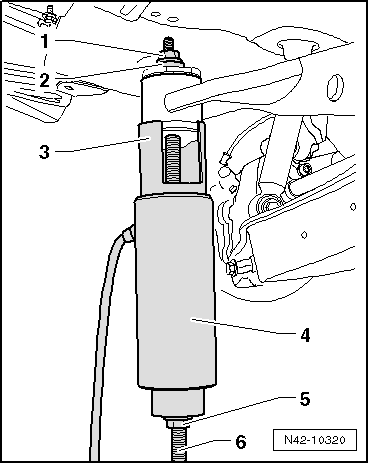
- Remove hex head bolt -1 or 2- on both sides.

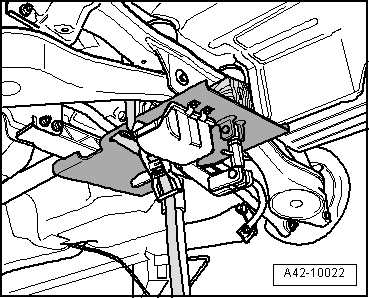
Note
Only the left side of the vehicle is shown in the illustration.
To secure the subframe, Locating Pins -T10096- must be screwed in one after the other on both sides of the vehicle at positions -1 and 2-.
- Location position of subframe with Locating Pins -T10096-.
Note
Locating Pins -T10096- may only be tightened to a maximum of 20 Nm, since otherwise the threads of the locating bolts will be damaged.
- Replace the bolts of the subframe one after the other on both sides using Locating Pins -T10096- and tighten them to 20 Nm.
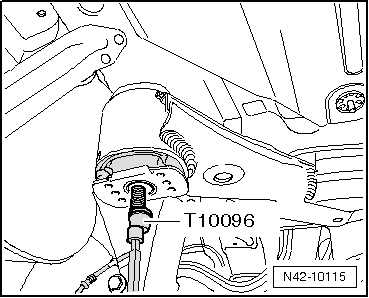
The subframe position is now secured.
- Lower subframe 10 cm using Engine and Gearbox Jack -VAS6931-.
- Mark the installation position of bonded rubber bushing to subframe, for example, with a felt-tip pen.
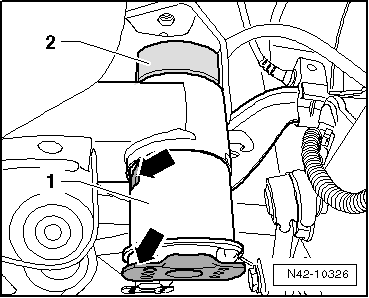
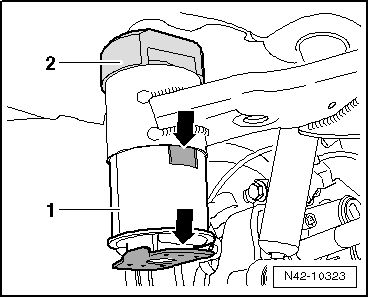
- Install special tools as depicted in the illustration.
- Hydraulic Press - Rear Subframe Bushing Tool Kit-Nut -T10263/5-
- Sleeve, from -T10263-
- Hydraulic Press - Rear Subframe Bushing Tool Kit - Tube -T10263/6-
- Hydraulic Press -VAS6178- with Bearing Installer - Wheel Hub/Bearing Kit- Pressure Head -T10205/13-
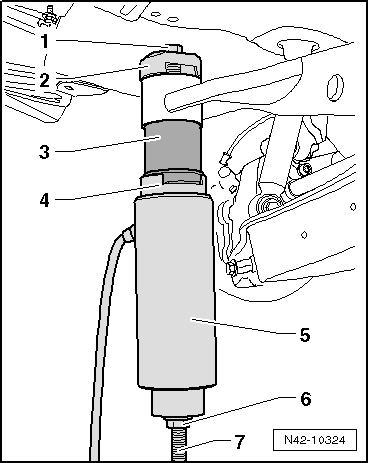
- Hydraulic Press - Rear Subframe Bushing Tool Kit-Nut -T10263/5-
- Hydraulic Press - Rear Subframe Bushing Tool Kit-Spindle -T10263/4-
- Pretension special tools.
- Pull out bonded rubber bushing by operating pump.

Note
The bearing outer race is sheared off when the bonded rubber bushing is removed. There is a loud crack when this happens.
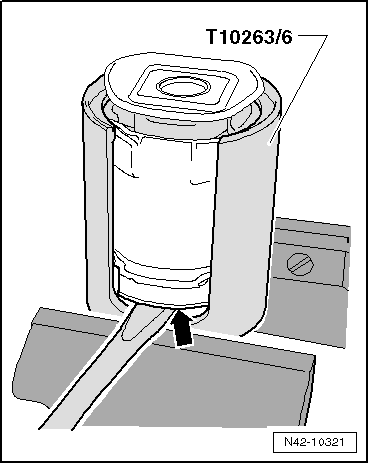
- After removing the rubber bonded bushing, it must then be removed from the Hydraulic Press - Rear Subframe Bushing Tool Kit - Pipe -T10263/6-.
- Mount the Hydraulic Press - Rear Subframe Bushing Tool Kit - Pipe -T10263/6- on the provided surfaces in a vise.
- Pry a screwdriver between the Hydraulic Press - Rear Subframe Bushing Tool Kit - Pipe -T10263/6- and the rubber bonded bushing -arrow- and, if necessary, remove the bushing by tapping lightly with a hammer on the drift.

Installing the Front Bonded Rubber Bushing
Install in reverse order of removal. Note the following when doing so:
- Front bonded rubber bushing
- Rear bonded rubber bushing

The front rubber bonded bushing has two notches -arrows- on top and have slightly different installation heights. Refer to the Parts Catalog.
Bonded rubber bushing must be installed in the correct direction, note marking on subframe.
- Install the rubber bonded bushing -1- into the subframe, so that the tab and the plate -arrows- face perpendicular to direction of travel.
- Mount the Hydraulic Press - Rear Subframe Bushing Tool Kit - Pressure Piece -T10263/3--2- so that the flat side faces perpendicular to direction of travel.
- Insert special tools with bonded rubber bushing into subframe as illustrated.
- Hydraulic Press - Rear Subframe Bushing Tool Kit-Nut -T10263/5-
- Hydraulic Press - Rear Subframe Bushing Tool Kit - Pressure Piece -T10263/3-
- Bonded Rubber Bushing
- Hydraulic Press - Rear Subframe Bushing Tool Kit - Thrust Piece -T10263/2-
- Hydraulic Press -VAS6178- with Bearing Installer - Wheel Hub/Bearing Kit- Pressure Head -T10205/13-
- Hydraulic Press - Rear Subframe Bushing Tool Kit-Nut -T10263/5-
- Hydraulic Press - Rear Subframe Bushing Tool Kit-Spindle -T10263/4-
- Pretension special tool with bonded rubber bushing.
- Carefully insert bonded rubber bushing by operating pump until collar lies on subframe "without a gap".
- Install the stabilizer bar.
- Connect the electrical connections between the rear axle and the body.
- Install the rear muffler.
- Install coil springs.
- Mount the rear wheels.
Pulling Out Rear Bonded Rubber Bushing
- Remove rear wheels.
- Remove the coil springs.
- Remove the rear muffler.
- Remove the clip -1-.

Note
Do not disconnect the brake line.
- Now secure vehicle on both sides to lifting arms on hoist with Tensioning Strap -T10038-.
WARNING
If vehicle is not secured, it could slide off of hoist.
- Place the Engine and Gearbox Jack -VAS6931- with Universal Support Plate -VAG1359/2- below subframe and secure with strap.

- Remove hex head bolt -1 or 2- on both sides.
Note
Only the left side of the vehicle is shown in the illustration.
To secure the subframe, Locating Pins -T10096- must be screwed in one after the other on both sides of the vehicle at positions -1 and 2-.
- Location position of subframe with Locating Pins -T10096-.
Note
Locating Pins -T10096- may only be tightened to a maximum of 20 Nm, since otherwise the threads of the locating bolts will be damaged.
- Replace the bolts of the subframe one after the other on both sides using Locating Pins -T10096- and tighten them to 20 Nm.

The subframe position is now secured.
- Lower subframe 10 cm using Engine and Gearbox Jack -VAS6931-.
- Mark the installation position of bonded rubber bushing to subframe, for example, with a felt-tip pen.
- Install special tools as depicted in the illustration.
- Hydraulic Press - Rear Subframe Bushing Tool Kit-Nut -T10263/5-
- Sleeve, from -T10263-
- Hydraulic Press - Rear Subframe Bushing Tool Kit - Tube -T10263/6-
- Hydraulic Press -VAS6178- with Bearing Installer - Wheel Hub/Bearing Kit- Pressure Head -T10205/13-
- Hydraulic Press - Rear Subframe Bushing Tool Kit-Nut -T10263/5-
- Hydraulic Press - Rear Subframe Bushing Tool Kit-Spindle -T10263/4-
- Pretension special tools.
- Pull out bonded rubber bushing by operating pump.
Note
The bearing outer race is sheared off when the bonded rubber bushing is removed. There is a loud crack when this happens.
- After removing the rubber bonded bushing, it must then be removed from the Hydraulic Press - Rear Subframe Bushing Tool Kit - Pipe -T10263/6-.
- Mount the Hydraulic Press - Rear Subframe Bushing Tool Kit - Pipe -T10263/6- on the provided surfaces in a vise.
- Pry a screwdriver between the Hydraulic Press - Rear Subframe Bushing Tool Kit - Pipe -T10263/6- and the rubber bonded bushing -arrow- and, if necessary, remove the bushing by tapping lightly with a hammer on the drift.
Pulling In Rear Bonded Rubber Bushing
Install in reverse order of removal. Note the following when doing so:
Distinguishing characteristic, rubber bonded bushing
- Front bonded rubber bushing
- Rear bonded rubber bushing
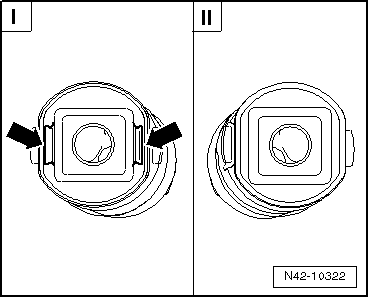
The front rubber bonded bushing has two notches -arrows- on top and have slightly different installation heights Parts Catalog.
Bonded rubber bushing must be installed in the correct direction, note marking on subframe.
- Install the rubber bonded bushing -1- into the subframe, so that the tab and the plate -arrows- face perpendicular to direction of travel.
- Mount the Hydraulic Press - Rear Subframe Bushing Tool Kit - Pressure Piece -T10263/3--2- so that the flat side faces perpendicular to direction of travel.
- Insert special tools with bonded rubber bushing into subframe as illustrated.
- Hydraulic Press - Rear Subframe Bushing Tool Kit-Nut -T10263/5-
- Hydraulic Press - Rear Subframe Bushing Tool Kit - Pressure Piece -T10263/3-
- Bonded rubber bushing
- Hydraulic Press - Rear Subframe Bushing Tool Kit - Thrust Piece -T10263/2-
- Hydraulic Press -VAS6178- with Bearing Installer - Wheel Hub/Bearing Kit- Pressure Head -T10205/13-
- Hydraulic Press - Rear Subframe Bushing Tool Kit-Nut -T10263/5-
- Hydraulic Press - Rear Subframe Bushing Tool Kit-Spindle -T10263/4-
- Pretension special tool with bonded rubber bushing.
- Carefully insert bonded rubber bushing by operating pump until collar lies on subframe "without a gap".
- Install the rear muffler.
- Install coil springs.
- Mount the rear wheels.
Tightening Specifications
| Component | Tightening Specification |
Subframe to body
|
90 Nm +90º |
 Rear Axle, Removing and Installing
Special tools and workshop equipment required
Torque Wrench 1332 40-200Nm -VAG1332-
Engine and Gearbox Jack -VAS6931-
Removing the Subframe and its Attachments
Note
Please note that the vehicle mu ...
 Subframe, Servicing, from 05/28/2012
Front Bonded Rubber Bushing, Replacing
Special tools and workshop equipment required
Tensioning Strap -T10038-
Hydraulic Press - Rear Subframe Bushing Tool Kit -T10263-
Subframe Bushing Assembly T ...
See More:
Volkswagen Tiguan Service and Repair Manual > Seat Frames: Passenger Seat with Pass-Through
Sill-Side Trim Panel, Removing and Installing
Removing
Remove the cover -1- and remove the release
lever -2-.
Pull the height adjustment handle -1-
upward.
Using a small screwdriver, push the metal tab on the clamp
-2- located on the inside of the height
adjustment handle, toward the s ...
Volkswagen Tiguan Owners Manual
Volkswagen Tiguan Service and Repair Manual
- Body exterior
- Body Interior
- General Paint Information
- Paint
- Brake System
- Suspension, Wheels, Steering
- Wheel and Tire Guide
- Towing Guide
- Wheel and Tire Guide General Information
- Communication
- Electrical Equipment General Information
- Electrical Equipment from 06/2011
- Heating, Ventilation and Air Conditioning
- Refrigerant R134a Servicing
- 6-Speed Manual Transmission 02Q, OBB, and OFB
