Volkswagen Tiguan Service and Repair Manual: Drive Axle with CV Joint VL107
Overview - Drive Axle with CV Joint VL107
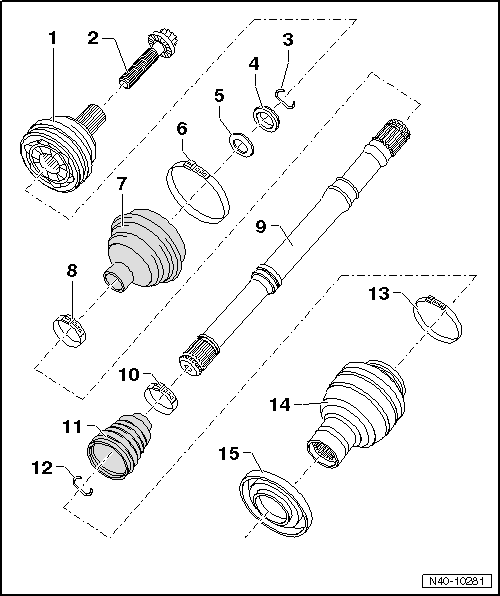
- Outer CV joint
- Replace only as a complete unit.
- Removing.
- Installing: drive onto shaft until impact using plastic hammer
- Checking.
- Bolt
- There are different versions.
- Allocation. Refer to the Parts Catalog.
WARNING
- There are two types of twelve-point bolts, with and without ribs. Distinguishing characteristics. Refer to → Fig. ""Difference between A Twelve-Point Bolt with Ribs and A Twelve-Point Bolt without Ribs""
- When installing a twelve-point bolt, always check what type of twelve-point bolt is to be used.
- Use the correct tightening specification for the specific bolt.
- The tightening specification for a twelve-point bolt "with" ribs is 70 Nm + 90º. Refer to → Chapter "Twelve-Point Bolt with Ribs, Loosening and Tightening, Drive Axle Threaded Connection" for loosening and tightening specifications.
- The tightening specification for a twelve-point bolt "without" ribs is 200 Nm + 180º. Refer to → Chapter "Twelve-Point Bolt without Ribs, Loosening and Tightening, Drive Axle Threaded Connection" for loosening and tightening specifications.
- Always replace if removed
- Circlip
- Always replace if removed
- Insert in shaft groove
- Thrust Ring
- Installation position.
- Plate Spring
- Installation position.
- Clamp
- Always replace if removed
- Tensioning.
- CV Boot
- Check for tears and scuffing
- Material: Hytrel polyelastomer
- Clamp
- Always replace if removed
- Tensioning.
- Driveshaft
- Clamp
- Always replace if removed
- Tensioning.
- CV Boot for CV Joint
- Material: Hytrel polyelastomer
- Without vent hole
- Check for tears and scuffing
- Circlip
- Always replace if removed
- Insert in shaft groove
- Clamp
- Always replace if removed
- Tensioning.
- CV Joint
- Replace only as a complete unit.
- Removing.
- Installing: Using a plastic hammer, drive onto the shaft as far as the stop
- Cap
- Remove.
- Installing.
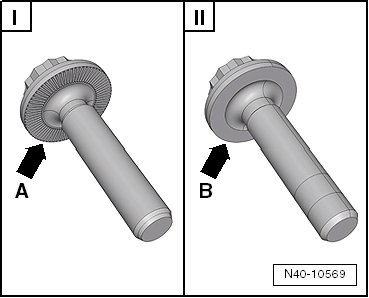
Difference between A Twelve-Point Bolt with Ribs and A Twelve-Point Bolt without Ribs
The contact surfaces -arrow A- and -arrow B- are different on the two-point bolts.
- Twelve-point bolt with ribs -arrow A-
- Twelve-point bolt without ribs -arrow B-
Drive Axle with CV Joint VL107, Disassembling and Assembling
Special tools and workshop equipment required
- Press Plate -VW401-
- Press Plate -VW402-
- Press Piece - Rod -VW408A-
- CV Joint Press Sleeve -VW522-
- Press Block -40-204A-
- Clamping Pliers -VAG1682A-
- Torque Wrench 1331 5-50Nm -VAG1331-
- Slide Hammer Set -VW771-
- Puller - Driveshaft -T10382-
Removing the Outer CV Joint
- Clamp the drive axle with protective jaws in a vise clamp.
- Fold back boot.
- Align the Puller - Driveshaft -T10382- so that the flat side of the Puller - Driveshaft - Removing Plate -T10382/1- faces the Puller - Driveshaft - Spindles -T10382/2-.
- Attach the Puller - Driveshaft -T10382- to the Slide Hammer Set -VW771-.
- Remove the CV joint from the drive axle using the Puller - Driveshaft -T10382- and Slide Hammer Set -VW771-.
- Puller - Driveshaft - Removing Plate -T10382/1-
- Puller - Driveshaft - Spindles -T10382/2-

Installing the Outer CV Joint
Installed Location: Spring Washer and Thrust Washer on Outer Joint
- Plate Spring
- Thrust Ring
- Install the new circlips.
- Slide the new CV boot onto the drive axle if necessary.
- Use a plastic hammer to install it on the shaft until the locking ring locks secure.
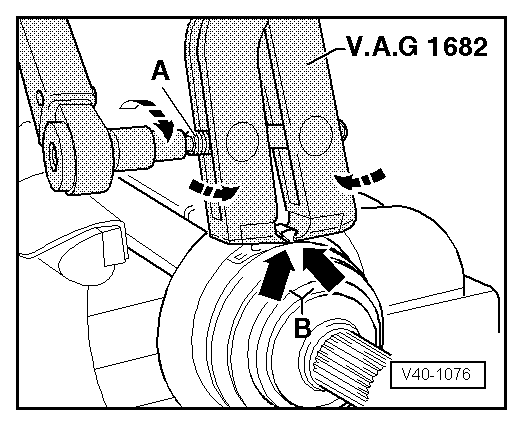
Inner CV Joint, Removing
- Clamp the drive axle with protective jaws in a vise clamp.
- Fold back boot.
- Remove the CV joint from the drive axle using a drift -A-.
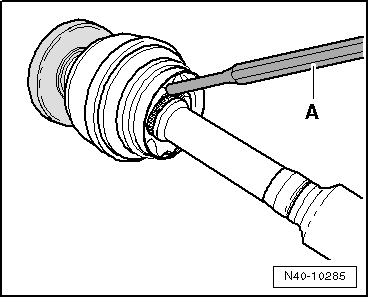
Drive must be applied exactly on star of CV joint.
Driving Joint On
- Use a plastic hammer to install it on the shaft until the locking ring locks secure.
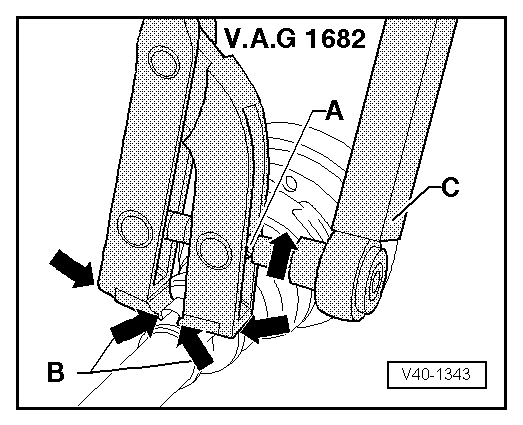
Tightening Clamp on Outer Joint
- Attach the Clamping Pliers -VAG1682A- as illustrated. When doing this, make sure that edges of clamping pliers are seated in corners -arrows B- of clamp.
- Tension clamp by turning spindle with a torque wrench (do not tilt clamp tool).
Note
- The hard material of the CV boot (compared to rubber) makes it necessary to use a stainless steel hose clamp. It is only possible to tighten the hose clamp with Clamping Pliers -VAG1682A-.
- Tightening specification: 25 Nm.
- Use torque wrench -C- with adjustment range 5...50 Nm (for example Torque Wrench 1331 5-50Nm -VAG1331-).
- Make sure the threads on the spindle -A- on the pliers move easily. Lubricate with MOS 2 grease, if necessary.
- If it does not move freely, for example due to dirt in thread, the required clamp tension will not be achieved at the specified torque.
Tensioning Clamp on Small Diameter
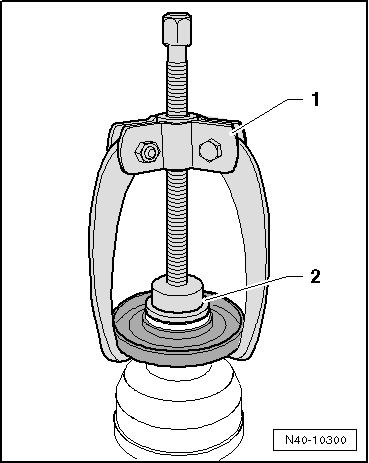
Removing the Cap from the CV Joint
- Three arm extractor, for example Kukko 45-2
- Press Piece - Multiple Use -VW447H-
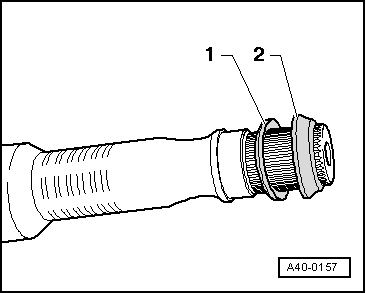
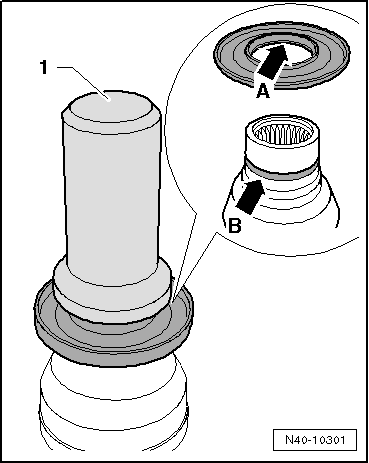
Mounting the Cap onto the CV Joint
- Seal Installer - Bevel Box -T10243-
Mount the cap far enough onto the joint until the ridge -arrow A- fits into the groove -arrow B-.
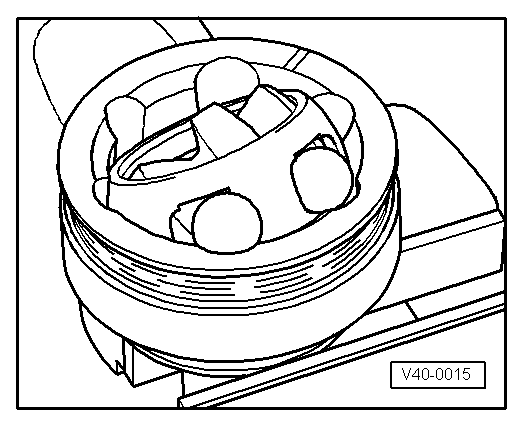
Outer CV Joint, Checking
It is necessary to disassemble the joint whenever replacing the grease or if the ball surfaces show wear or damage.
Removing
- Mark position of ball hub to ball cage and to housing before disassembling, using an electric engraver or grindstone.
- Swivel the ball hub and ball bearing cage.
- Remove the balls one after the other.
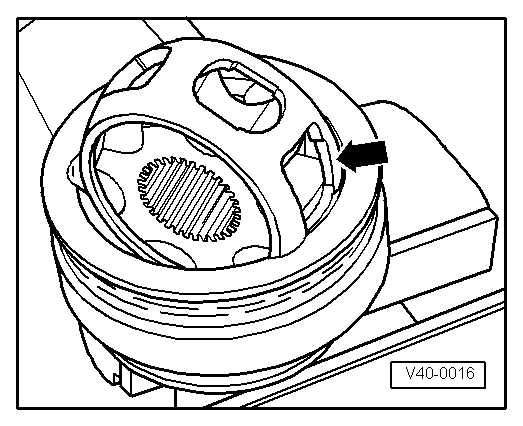
- Turn cage, until two rectangular windows -arrow- contact joint body.
- Lift out cage with hub.
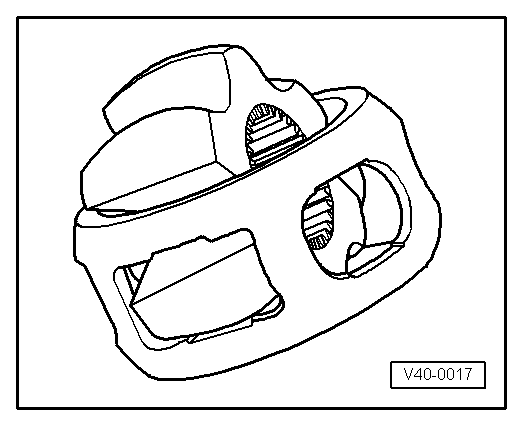
- Swing segment of hub into rectangular window of cage.
- Fold hub out from cage.
6 balls for each joint belong to a tolerance group. Check stub axle, hub, cage and balls for small depressions (pitting build-up) and chafing. Excessive circumferential backlash in joint makes itself noticed via tip-in shock, in such cases joint should be replaced. Flattening and running marks of balls are no reason to replace joint.
Installing
- Press in half of the total grease amount (40 grams) into joint body.
- Insert cage with hub into joint body.
- Press in opposing balls in sequence, during this, previous position of ball hub to ball cage and to joint body must be established again.
- Install new circlip into the hub.
- Distribute remaining grease in cover.
 Drive Axle with CV Joint VL 107 Bolted
Overview - Drive Axle with CV Joint VL 107 Bolted
Bolt
There are different versions.
Allocation. Refer to the Parts Catalog.
WARNING
There are two types of twelve-point bolts, with and ...
 Drive Axle with Triple Roller Joint AAR3300i
Overview - Drive Axle with Triple Roller Joint AAR3300i
Outer CV Joint
Replace only as a complete unit.
Removing.
Installing: Drive onto shaft with plastic hammer until compressed
circli ...
See More:
Volkswagen Tiguan Service and Repair Manual > Wheels, Tires, Wheel Alignment: Wheel, Changing and Mounting
General Information
WARNING
The secure seating of the wheel bolts and the wheels is only ensured if the
instructions and checks below are followed.
Note
After removing or installing one or multiple tires, the tire pressure
monitoring system must be recalibrated for vehicles with tire pressure
mon ...
Volkswagen Tiguan Owners Manual
Volkswagen Tiguan Service and Repair Manual
- Body exterior
- Body Interior
- General Paint Information
- Paint
- Brake System
- Suspension, Wheels, Steering
- Wheel and Tire Guide
- Towing Guide
- Wheel and Tire Guide General Information
- Communication
- Electrical Equipment General Information
- Electrical Equipment from 06/2011
- Heating, Ventilation and Air Conditioning
- Refrigerant R134a Servicing
- 6-Speed Manual Transmission 02Q, OBB, and OFB
