Volkswagen Tiguan Service and Repair Manual: Rear Brakes, Servicing
Overview - Rear Brakes CII 41
Note
- Use the Brake Charger/Bleeder Unit -VAS5234- or the Brake Pedal Actuator -VAG1869/4- to extract brake fluid from brake fluid reservoir.
- Install the Brake Pedal Actuator -VAG1869/2- to relieve pressure before removing a brake caliper or disconnecting a brake hose.
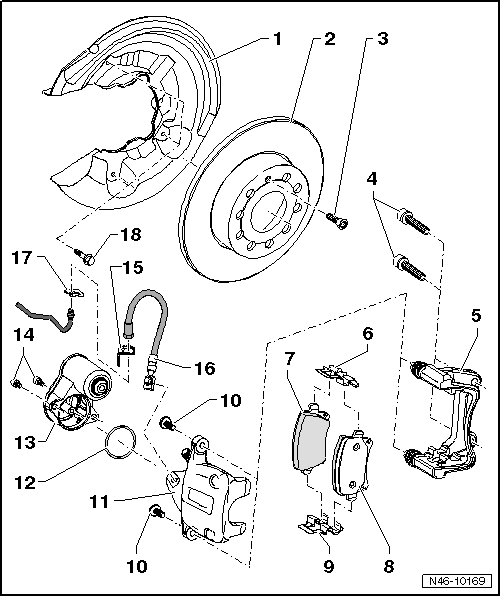
- Cover Plate
- Allocation. Refer to the Parts Catalog
- Brake Rotor
- Diameter 286 mm
- Thickness: 12 mm
- Wear limit: 10 mm
- Replace both sides if worn.
- To remove, first remove the brake caliper and carrier
- TORX Socket Bolt
- 4 Nm
- Internal Multi-Point Bolt
- 90 Nm + 90º
- Always replace if removed
- Brake Carrier with Guide Pins and Protective Cap
- Delivered as an assembled replacement part with sufficient grease on the guide pins
- Install the repair kit if the caps or guide pins are damaged. Use the supplied grease packet to lubricate guide pins
- Brake Pad Retaining Plate
- Always replace when pads are replaced
- Brake Pad
- Thickness: 11 mm without backing plate
- Wear limit: 2 mm without backing plate
- Thickness, Checking.
- Always replace on both axles.
- Removing and installing.
- Brake Pad
- Thickness: 11 mm without backing plate
- Wear limit: 2 mm without backing plate
- Thickness, checking.
- Always replace on both axles.
- Removing and installing.
- Brake Pad Retaining Plate
- Always replace when pads are replaced
- Self-Locking Bolt
- 35 Nm
- Replacing
- Brake Caliper
- Do not remove the brake hose when changing the brake pads.
- Removing and installing.
- Servicing.
- After installing or replacing, a basic setting must be performed.
- Seal
- Parking Brake Motor
- TORX Socket Bolt
- 12 Nm
- Bracket
- To the subframe
- Brake Hose with Ring Connection and Banjo Bolt
- 35 Nm
- To the brake caliper
- To the brake line, 14 Nm
- Clip
- Hex Bolt
- 12 Nm
Brake Pads, Removing and Installing
Special tools and workshop equipment required
- Vehicle Diagnostic Tester
- Diagnostic Cable -VAS5051/1- or Diagnostic Cable -VAS5051/3-
- Torque Wrench 1331 5-50Nm -VAG1331-
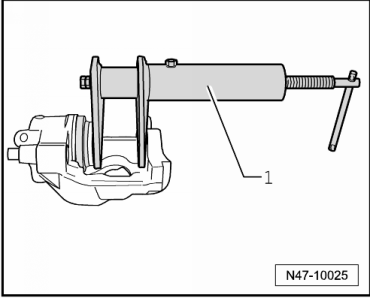
- Piston Resetting Tool -T10145-
Removing
When removing, mark the brake pads that will be used again. Install in the same position, otherwise the braking effect will be uneven.
Note
Do not disconnect the connectors from the parking brake motors.
- Parking brake not actuated.
- Remove the wheels.
The pistons of the parking brake must be driven back using the Vehicle Diagnostic Tester.
Before pressing the piston back, extract the brake fluid from brake fluid reservoir. Otherwise the brake fluid will overflow and cause damage, especially if the brake fluid was added intermittently.
- Connect the -Vehicle Diagnostic Tester- and select the function.
- Select the electro-mechanical parking brake and the function "Moving piston of parking brake motor out and in".
- Drive the pistons back using the Vehicle Diagnostic Tester.
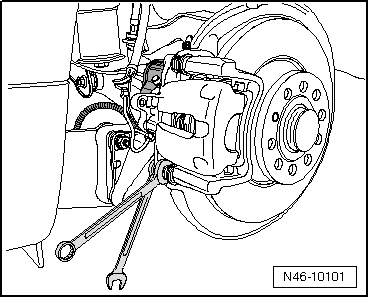
- Then, unscrew the bolts from the brake caliper, while counterholding the guide pins.
- Remove the brake caliper downward from the brake carrier.
Note
Resetting the piston with Vehicle Diagnostic Tester is often not sufficient but necessary! The thrust nut in the piston is a sliding mount so the piston can only be pressed and cannot be pulled back. Only the spindle with the thrust nut is moved back.
Caution
The piston must first be reset with the Vehicle Diagnostic Tester.
- Now press the piston all the way back with the Piston Resetting Tool -T10145-.
- Secure the brake caliper with wire so the weight of caliper does not hang from or damage the brake line.
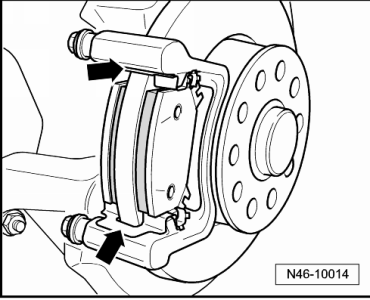
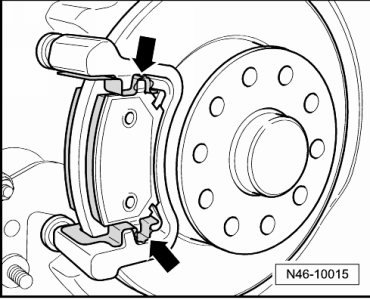
- Remove the brake pads and brake pad retaining plates -arrows-.
Cleaning
WARNING
Do not blow the brake system using compressed air, the dust produced is harmful to health!
- Thoroughly clean contact surfaces for brake pads at brake carrier, remove corrosion.
- Clean the brake caliper.
Only use mineral spirits for cleaning the brake caliper.
Installing
- Insert the brake pad retaining plates -arrows- and brake pads in brake carrier.

- Make sure that the brake pads are located correctly in the brake pad retaining plates -arrows-.
- Secure the brake caliper using new self-locking bolts.
- The repair kit includes four self-locking hex bolts which must be installed in all cases.
After driving the pistons out with the Vehicle Diagnostic Tester, a basic setting of the brake system must be performed.
- Perform a brake system basic setting using the Vehicle Diagnostic Tester.
- Install the wheels.
Wheel bolt tightening specifications.
Note
Check the brake fluid level after replacing the brake pad.
Tightening Specification
Hex bolt, brake caliper to brake carrier 35 Nm
- Use new bolts.
Brake Caliper, Removing and Installing
Special tools and workshop equipment required
- Torque Wrench 1331 5-50Nm -VAG1331-
- Brake Pedal Actuator -VAG1869/2-.
- Vehicle Diagnostic Tester
- Diagnostic Cable - VAS5051/1- or Diagnostic Cable - VAS5051/3-
Removing
The procedure only applies to the replacement of or subsequent repair work done on the brake caliper.
Note
Do not disconnect the connectors from the parking brake motors.
- Remove the wheels.
The pistons of the parking brake must be driven back using the Vehicle Diagnostic Tester.
Before pressing the piston back, extract the brake fluid from brake fluid reservoir. Otherwise the brake fluid will overflow and cause damage, especially if the brake fluid was added intermittently.
- Connect the -Vehicle Diagnostic Tester- and select the function.
- Select the electro-mechanical parking brake and the function "Moving piston of parking brake motor out and in".
- Drive the pistons back using the Vehicle Diagnostic Tester.
- Remove the parking brake motor without disconnecting the connector.
- Connect the bleeder hose of bleeder bottle to the brake caliper bleed valve and then open the bleeder valve.
- Insert the Brake Pedal Actuator -VAG1869/2-.
- Close the bleeder valve and remove the bleeder bottle.
- Remove the brake line from the brake hose and brake caliper.
- Remove both bolts from brake caliper, counterhold on guide pin when doing this.
- Pull off the brake caliper from the brake carrier.
Installing
Brake pads sit in springs on the brake carrier.
- Secure the brake caliper on brake carrier using new self-locking bolts.
Ring groove and contact surface of parking brake motor must be clean.
- Install the new seal.
- Rotate the spindle back slightly with an 8 mm multi-point socket until the parking brake motor can be positioned correctly.
- Carefully set the parking brake motor in place, paying attention to the seat of the seal.
- Rotate the parking brake motor until the bolt hole and threads are aligned.
Make sure that the parking brake motor is seated flush against the brake caliper. Do not, under any circumstances, pull the parking brake motor against the brake caliper using the bolts.
- Set the TORX bolts in place by hand and then tighten.
- Screw the brake line on brake caliper.
- Bleed the brake system.
After driving the pistons out with the Vehicle Diagnostic Tester, a basic setting of the brake system must be performed.
- Perform a brake system basic setting using the Vehicle Diagnostic Tester.
- Install the wheels.
Wheel bolt tightening specifications.
Note
Check the brake fluid level.
Tightening Specifications
Hex bolt, brake caliper to brake carrier 35 Nm
- Use new bolts.
Brake hose to brake caliper 35 Nm
Parking brake motor to brake caliper 12 Nm
 Front Brakes, Servicing
Overview - Front Brakes FN 3
Note
After every brake pad replacement, firmly press down on the brake pedal
several times with vehicle stationary so that the brake pads are properly
set in their r ...
 Electro-Mechanical Parking Brake
Component Overview - Electro-Mechanical Parking Brake
Electromechanical Parking Brake Button -E538-
Component location: inside the center console
Removing and installing.
Electromechanic ...
See More:
Volkswagen Tiguan Service and Repair Manual > Battery, Starter, Generator, Cruise Control: Generator
General Information
Note
Check the generator. Refer to Wiring Diagrams, Fault Finding Electrical
Systems and Installed Locations.
Generator on A Vehicle with the Start/Stop System:
Up to now, the generator and the voltage regulator were connect to the
engine- and vehicle electrical system control ...
Volkswagen Tiguan Owners Manual
Volkswagen Tiguan Service and Repair Manual
- Body exterior
- Body Interior
- General Paint Information
- Paint
- Brake System
- Suspension, Wheels, Steering
- Wheel and Tire Guide
- Towing Guide
- Wheel and Tire Guide General Information
- Communication
- Electrical Equipment General Information
- Electrical Equipment from 06/2011
- Heating, Ventilation and Air Conditioning
- Refrigerant R134a Servicing
- 6-Speed Manual Transmission 02Q, OBB, and OFB
