Volkswagen Tiguan Service and Repair Manual: Wheel Housing Liner
Tools
Special tools and workshop equipment required
- Torque Wrench 1783 - 2-10Nm -VAG1783-
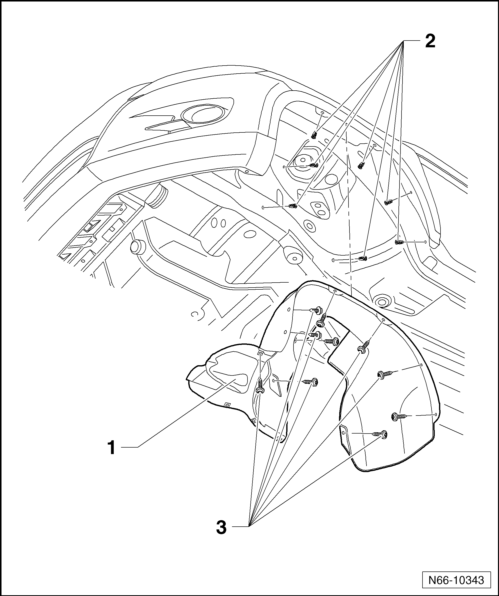
Overview - Front Wheel Housing Liner
Note
- The illustration shows the left side. The right side is identical.
- Depending on the model, there may be small differences when removing and installing.
- Front wheel housing liner consists of front and rear parts.

- Wheel Housing Liner
- Material - PP/EPDM
- Removing and installing.
- Expanding Nut
- Quantity: 7
- Screw
- Tightening specification: 2 Nm
- Quantity: 11
Front Wheel Housing Liner, Removing and Installing
Note
The following describes the removal and installation of the left front wheel housing liner. Removing and installing right front wheel housing liner is identical.
Removing
- Remove the wheel.
- Remove the bolts -2-.
- Pull off wheel housing liner -1-.
Installing
- Inspect the speed nuts for damage.
Install in reverse order of removal.
Overview - Rear Wheel Housing Liner
Note
The illustration shows the right side. The left side is identical.
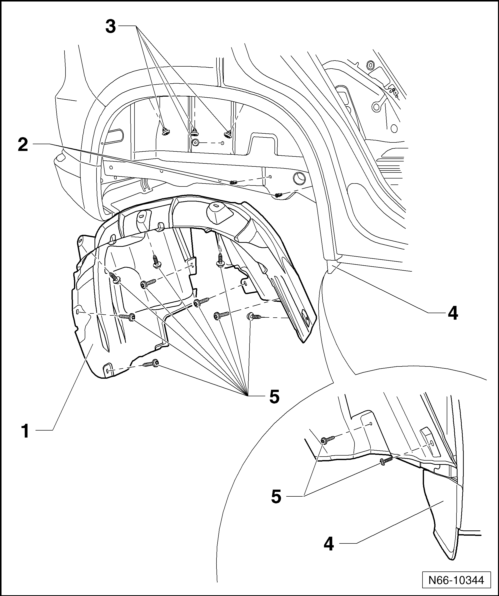
- Wheel Housing Liner
- Material - PP/EPDM
- Removing and installing.
- Expanding Nut
- Speed Nut
- Gas-tight
- Quantity: 3
- Rear Sill Panel Cover
- Screw
- Tightening specification: 2 Nm
- Quantity: 10
Rear Wheel Housing Liner, Removing and Installing
Note
Removing and installing is described only for the right rear wheel housing liner. Removing and installing left rear wheel housing liner is derived accordingly from this.
Removing

- Remove the wheel.
- Remove the bolts -5-.
- Pull the wheel housing liner -1- in the rear area.
- Pull the wheel housing liner -1- upward out of the sill panel cover -4-.
Installing
Note
The speed nuts -3- are gas-tight.

- Inspect the speed nuts -3- for damage.
- Mount the wheel housing liner -1- from the top into the sill panel cover -4-.
- Press the wheel housing liner -1- into the wheel housing.
- Tighten the screws -5- (tightening specification: 2 Nm).
Sill Panel Cover, Removing and Installing
Removing
Note
The -arrow c - points to the direction of travel.
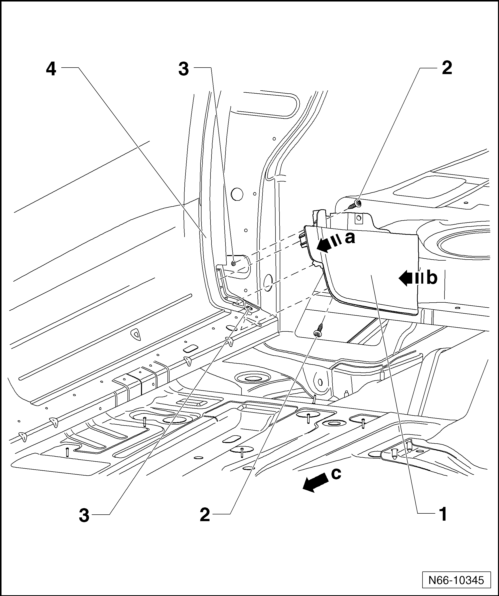
- Remove the screws -2-.
- Remove the sill panel cover -1- out of the retainers -a and b arrows-.
Installing
Note
The -arrow c - points to the direction of travel.

- Inspect the speed nuts -3- for damage.
- Press the sill panel cover -1- into the retainers -a and b arrows-.
- Tighten the screws -2- (tightening specification: 2 Nm).

 Exterior Rearview Mirror
Tools
Special tools and workshop equipment required
Pry Lever -80 - 200-
Torque Wrench 1783 - 2-10Nm -VAG1783-
Overview - Exterior Rearview Mirror
Note
The illustration shows the right side. The l ...
See More:
Volkswagen Tiguan Service and Repair Manual > Sunroof: Rear Lid, Removing and Installing
Removing
Remove the assembly frame from the vehicle.
Remove the inner seal -2- from the assembly
frame -1-.
Remove the sun shade.
Loosen the wiring harness from the rear lid.
Remove the screws -3- from the rear lid
-2- on the guide rail -1-
.
Mark the location -arrow- on the r ...
Volkswagen Tiguan Owners Manual
Volkswagen Tiguan Service and Repair Manual
- Body exterior
- Body Interior
- General Paint Information
- Paint
- Brake System
- Suspension, Wheels, Steering
- Wheel and Tire Guide
- Towing Guide
- Wheel and Tire Guide General Information
- Communication
- Electrical Equipment General Information
- Electrical Equipment from 06/2011
- Heating, Ventilation and Air Conditioning
- Refrigerant R134a Servicing
- 6-Speed Manual Transmission 02Q, OBB, and OFB
