Volkswagen Tiguan Service and Repair Manual: Front Bumper Cover, Street Version from 07/2011
Note
Before replacing the bumper cover, see if it is possible to repair the damage.
Parking Aid Bracket, Installing
Tools
Special tools and workshop equipment required
- PDC Holder Tool Set -VAS6614B-
- Hand Cartridge Gun -VAS5155-
Materials
Note
Correct material part numbers. Refer to the "Electronic Parts Catalog (ETKA)".
- Two-Part Plastic Adhesive
- Adhesive for Plastic
- Cleaning Solution
- Primer Applicator
Bracket, Installing
Note
After the bumper cover is painted, install the brackets.
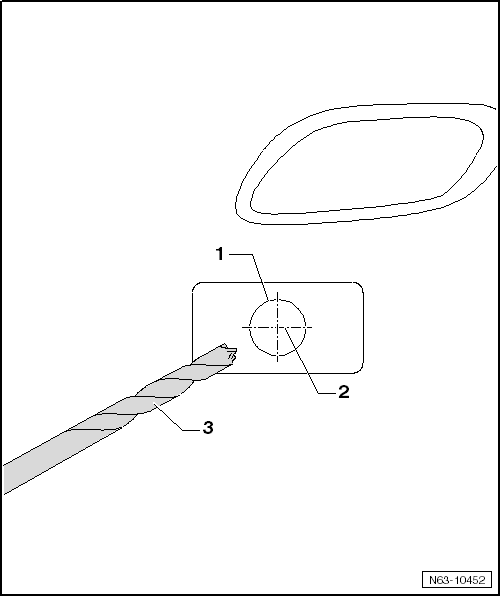
The four markings for the bracket -1- are found on the inside of the bumper cover.
- Determine the central point -2-, if not already present.
- Drill the holes from the inside outward with the drill -3- supplied in the tool kit.
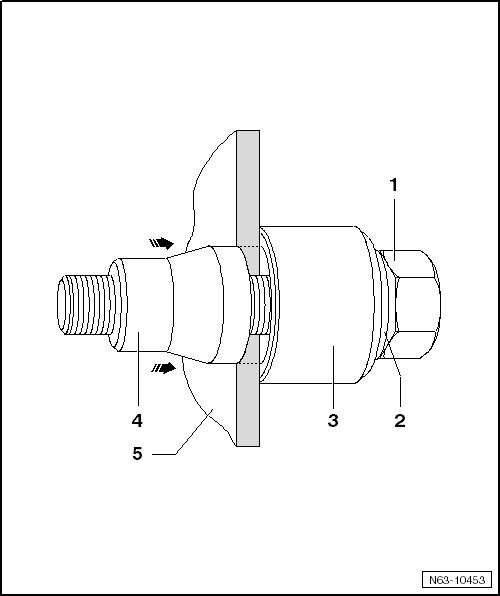
- Position the hole stamper with the bolt head -1-, washer -2- and counterholder -3- on the inside of the bumper cover -5-.
- Position the iron punch -4- almost up to the bumper cover.
- Push the iron punch -4- onto the bumper cover
- Tighten the hole stamper -1-.
Note
The iron punch -4- must not rotate on the bumper cover paint.
- By turning at the bolt head -1-, the iron punch -4- is pulled through the bumper cover material -5--arrows-.
- Remove the hole stamper and stamp the next holes.
- Thoroughly clean the bumper cover and bracket with cleaning solution.
Note
Approximately 1 cm of adhesive from the tip should not be applied.
- Lightly sand the inside of the bumper cover -6- and thoroughly clean it.
- Very thinly apply the adhesive for plastic to the bumper cover and bracket and let it set for 10 minutes.
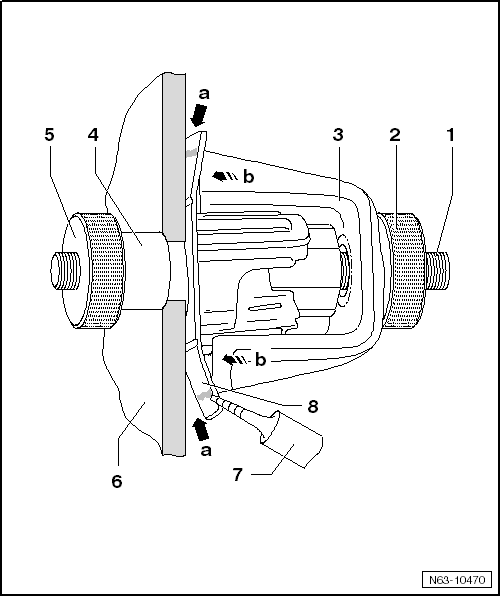
- Slide the bracket -8- onto the centering drift -1- and push it through the bumper cover -6-.
- Slide on the counterholder -4- and lightly tighten the knurled nut -5-.
- Slide on the clamping clip -3- and position the knurled nut -2-, but do not tighten.
- All brackets are prepared up to this step.
Note
The adhesive cannot run up to the bend.
- Apply the adhesive as shown in the illustration and tighten the knurled nut -2-.
- Remove all of the centering drifts after the minimum curing time
Minimum Curing Time
Wait 30 minutes for the minimum curing time before performing any further work on the bumper cover and the brackets.
The bumper cover must stay in place and may not be moved during this time.
Overview - Front Bumper Cover
- Front Bumper Cover
- PP/EPDM material
- Removing and installing.
- Screw
- Tightening specification: 2 Nm
- Quantity: 4
- Screw
- Tightening specification: 2 Nm
- Quantity: 3
- Wheel Cover
- "R Line", Removing and installing.
- Removing and installing.
- Bracket
- Screw
- Tightening specification: 2 Nm
- Quantity: 2
Front Bumper Cover, Removing and Installing
Note
Slight changes may have to be made to removal and installation procedures of front bumper cover, depending upon equipment installed in vehicle.
Removing
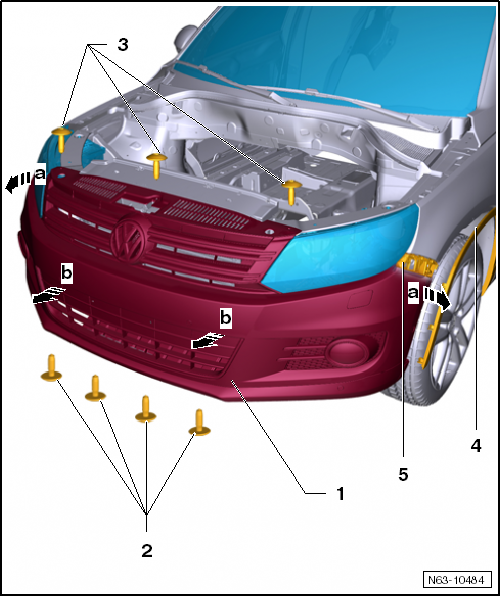
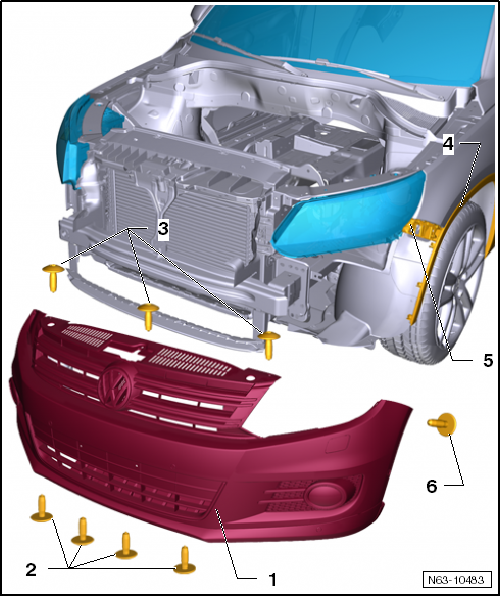
- Loosen the left and right front wheel housing liners in the bumper cover area.
- In vehicles with Volkswagen R GmbH "R-Line" optional equipment, remove the wheel covers -4-.
- Loosen the wheel covers -4- from the retainers in the bumper cover area.
- Remove the bolts behind the wheel cover.
- Remove the bolts -2- from below.
- Remove the bolts -3-.
A second technician is required for the rest of the removal procedure.
- Remove the bumper on the corners -arrows a- outward from the mount retainers-5-.
- With a second technician, pull the bumper cover -1- parallel -arrows b- out of mounts on the headlamps.
- Disconnect the connectors from any electrical components and the hoses.
Information and procedures regarding the parking aid.
For information and procedures regarding parallel parking assistance.
- If equipped, disconnect the hose couplings for the washer fluid hoses.
Installing
Install in reverse order of removal.
Note
When installing the front bumper cover, make sure it is guided onto the headlamp so that it is parallel.
- Press the bumper on the corners into the mount retainers.
- Check the parallel alignment and the gap dimensions.
Front Bumper Cover Attachments
Note
Different versions depending on the model. Allocation. Refer to Parts Catalog
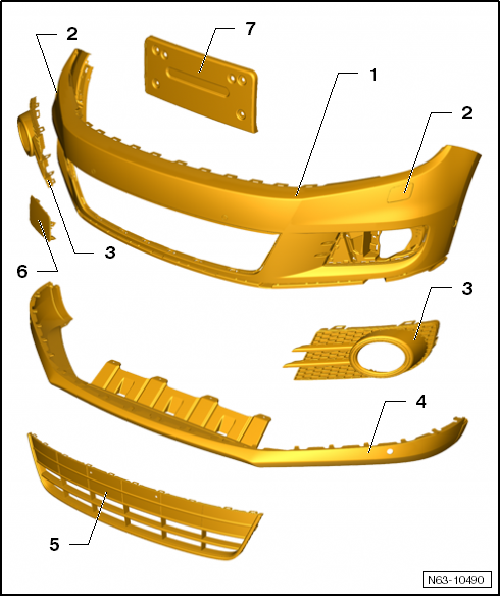
- Front Bumper Cover
- PP/EPDM material
- Removing and installing.
- Headlamp Washer System Cover
- Left and right
- Air Grille
- Left and right
- Locked to bumper cover
- Remove only when bumper cover -1- has been removed
- Spoiler
- PC/ABS material
- Locked to bumper cover
- Remove only when bumper cover -1- has been removed
- Center Air Grille
- Locked to bumper cover
- Remove only when bumper cover -1- has been removed
- Towing Eye Cover
- License Plate Holder
Front Bumper Cover Substructure
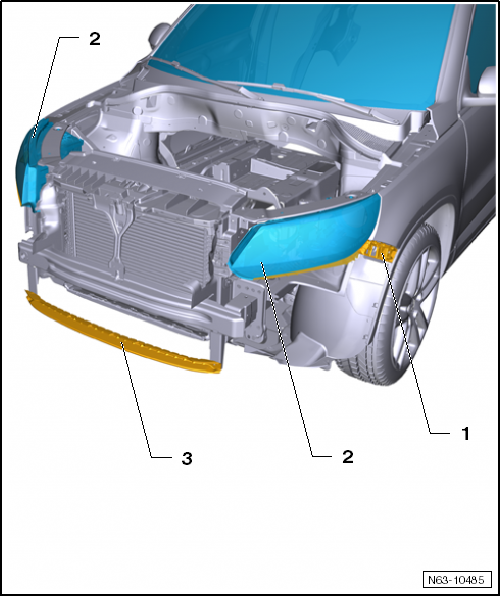
- Guide
- Left and right
- Headlamps
- With mounting brackets for the bumper cover
- Crossmember
- For mounting the bumper cover
- Pedestrian protection, not applicable in all countries
Overview - Front Bumper Carrier
Note
The bumper carriers cannot be interchanged between the street version and off-road version.
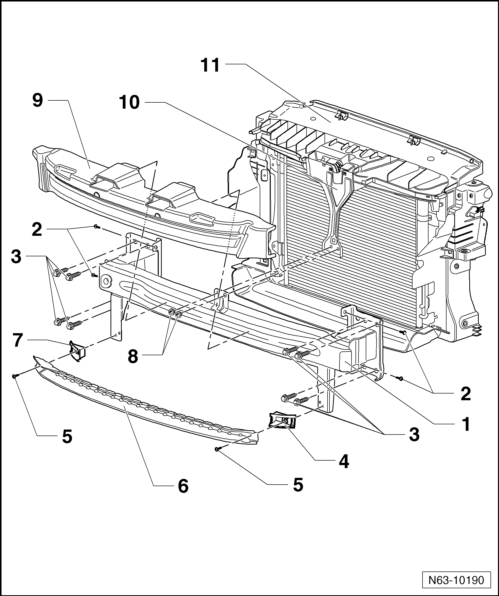
- Front Bumper Carrier
- Bolt
- Tightening specification: 8 Nm
- Left and right
- Quantity: 2 on each side
- Bolt
- Tightening specification: 60 Nm
- Quantity: 8
- Bracket
- Bolt
- Tightening specification: 8 Nm
- Quantity: 2
- Crossmember
- Pedestrian protection, not applicable in all countries
- Is bolted to bumper carrier
- Bracket
- Bolt
- Tightening specification: 8 Nm
- Quantity: 2
- Foam Piece
- Self-adhesive
- Lock Support
- Lock Carrier
 Front Bumper Cover, Street and Off-Road Version Differences
General Information
Tiguan is offered with two different bumper covers.
The bumper cover for the street version is designed for an 18º slope angle.
The bumper cover for the off-road version is de ...
 Front Bumper Cover, Off-Road Version with 28º Slope Angle, through 06/2011
Tools
Special tools and workshop equipment required
Torque Wrench 1783 - 2-10Nm -VAG1783-
Torque Wrench 1332 40-200Nm -VAG1332 -
Front Bumper Cover, Servicing
Note
Before replacing the bumper cove ...
See More:
Volkswagen Tiguan Service and Repair Manual > Seam Sealing: Seam Sealing, Front Body
Note
When repairing, seam sealing is to be replicated according to its
original conditions in appearance and layer thickness.
Sealing seams near attachments to be installed must be applied smoothly
In order to avoid damage and malfunctions.
Water drain holes must remain free.
All threaded p ...
Volkswagen Tiguan Owners Manual
Volkswagen Tiguan Service and Repair Manual
- Body exterior
- Body Interior
- General Paint Information
- Paint
- Brake System
- Suspension, Wheels, Steering
- Wheel and Tire Guide
- Towing Guide
- Wheel and Tire Guide General Information
- Communication
- Electrical Equipment General Information
- Electrical Equipment from 06/2011
- Heating, Ventilation and Air Conditioning
- Refrigerant R134a Servicing
- 6-Speed Manual Transmission 02Q, OBB, and OFB
