Volkswagen Tiguan Service and Repair Manual: Rear Door
Tools
Special tools and workshop equipment required
- Wrench - Door Adjusting -3320-
- Door Adjusting Wrench - Joint -3320/1-
- Wrench - Door Adjusting - Box Wrench -3320/2-
- Wrench - Door Adjusting - Box Wrench -3320/3-
- Torque Wrench 1331 5-50Nm -VAG1331-
- Cylinder Head Bolt Socket -3410-
- Gauge - Gap Adjustment -3371-
- Trim Removal Wedge -3409-
Overview - Rear Door

- Door
- Removing and installing
- Door, adjusting.
- Door Handle with Backing Plate
- Door Handle with Backing Plate
- Cap
- Removing and installing.
- Subframe with Door Lock
- The door lock can only be removed with the subframe.
- Remove the subframe.
- Door Lock, Removing and installing.
- Bolt
- Tightening specification: 30 Nm
- Door Hinge
- The hinge has two sections.
- Bolt
- Tightening specification: 32 Nm
- Always replace bolts after removing them.
- Bolt
- Tightening specification: 30 Nm
- Door Strap
- Bolt
- Tightening specification: 9 Nm
- Bolt
- Tightening specification: 32 Nm
- Always replace bolts after removing them.
- Door Hinge
- The hinge has two sections
- Bolt
- Tightening specification: 30 Nm
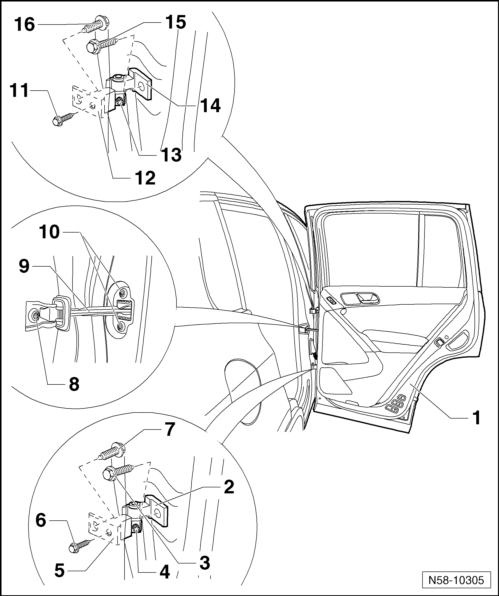
Overview - Door Hinges
Note
- The illustration shows the right side. The left side is identical.
- Always replace the door hinge bolts after loosening them.
- Lubricate the new door hinge if the old one was replaced.
- Door
- Removing and installing
- Adjusting
- Door Hinge
- A bolt -4- attaches the upper section to the lower section.
- The hinge has two sections.
- Lubricate if the hinge is replaced.
- Bolt
- Tightening specification: 32 Nm
- Always replace bolts after removing them.
- Bolt
- Tightening specification: 30 Nm
- This bolt must be removed in order to remove the door from the hinge
- Door Hinge
- A bolt -4- attaches the lower section to the upper section of the hinge.
- The hinge has two sections.
- Lubricate if the hinge is replaced.
- Bolt
- Tightening specification: 32 Nm
- Installed from the vehicle interior
- Lower B-Pillar trim panel, removing.
- After replacing the B-pillar, other tightening specifications are to be observed.
- Always replace bolts after removing them.
- Bolt
- Tightening specification: 32 Nm
- After replacing the B-pillar, other tightening specifications are to be observed.
- Always replace bolts after removing them.
- Bolt
- Tightening specification: 32 Nm
- Door Strap
- Bolt
- Tightening specification: 9 Nm
- Quantity: 2
- Bolt
- Installed from the vehicle interior
- Lower B-Pillar trim panel, removing.
- Tightening specification: 32 Nm
- After replacing the B-pillar, other tightening specifications are to be observed.
- Always replace bolts after removing them.
- Door Hinge
- The lower portion is attached to the upper portion of the hinge by the bolt -13-.
- The hinge has two sections.
- Lubricate if the hinge is replaced.
- Bolt
- Tightening specification: 30 Nm
- This bolt must be removed in order to remove the door from the hinge
- Door Hinge
- A bolt -13- attaches the upper section to the lower section.
- The hinge has two sections.
- Lubricate if the hinge is replaced.
- Bolt
- Tightening specification: 32 Nm
- Always replace bolts after removing them.
- Bolt
- Tightening specification: 32 Nm
- After replacing the B-pillar, other tightening specifications are to be observed.
- Always replace bolts after removing them.
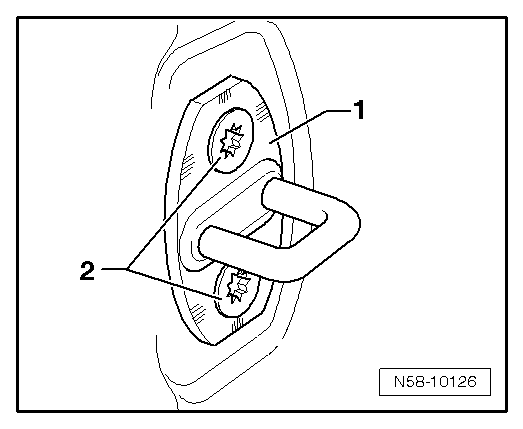
New Door Hinges, Lubricating
Note
- The description applies to the right side. The left side is identical.
- Lubricate the new door hinge after the painting is completed.
- The upper door hinge -1- is lubricated all around -arrows- at the pins and hole with Lithium Grease - G 000 150-.
- The lower hinge -1- is lubricated all around -arrows- at the pins and hole with Lithium Grease - G 000 150-.
Door, Removing and Installing
Note
The following describes removing and installing the right door. Removing and installing the left door is identical.
Removing
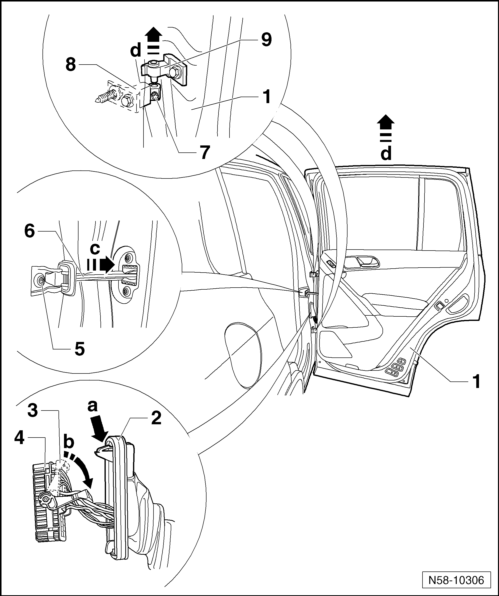
- Release bellows -2- by pressing on locking mechanism -arrow a- and remove boot from B-pillar.
- Swing the locking lever -3- downward -arrow b- and disconnect the connector -4- from the connector station.
- Remove the bolt -5- and slide the door strap -6- toward the inside-arrow c-.
- Loose the bolt -7- on both lower hinge parts -8-.
- Lift the door upward -arrows d- together the upper sections of the hinge -9-.
- When installing the door, observe the different tightening specifications.
- If the B-pillar was replaced, then proceed as described under "Installing after Replacing the B-Pillar".
- If the B-pillar was not replaced, then proceed as described under "Installing".
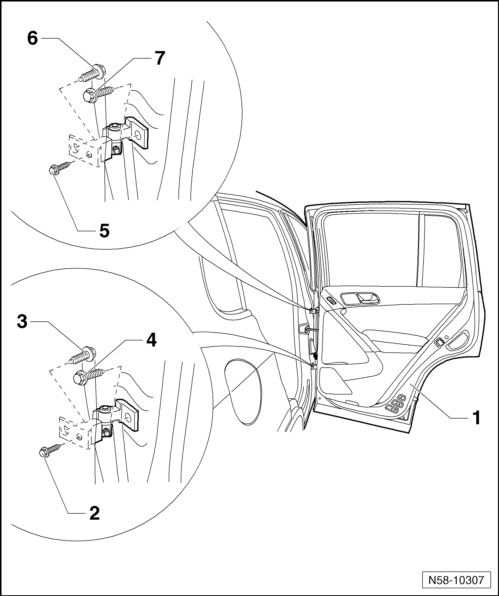
Installing

Install in reverse order of removal.
- Tightening specifications for bolt -5-: 32 Nm
- Tightening specification for bolts -7-: 30 Nm
- Note the gap dimensions of the rear door.
Installing after Replacing B-Pillar
WARNING
If the B-pillar was replaced, the bolts in the B-pillar must be tightened as described.

The B-pillar was replaced.
Install in reverse order of removal.
- Install the door and tighten the bolts -6, 7, 11 and 16- to 32 Nm.
- Assemble the door completely
- After completing all the work, tighten the bolts -6, 7, 11 and 16- to 20 Nm.
Always replace the bolts.
- Make sure the front door gap dimension is correct.
Door, Adjusting
Note
- The vehicle must standing on all four wheels when adjusting the rear door.
- The rear door is properly adjusted when there is an overall even gap dimension when closed, it is not too far inward or outward and contours align.
- To adjust or check gap dimensions.
- Perform corrosion protection measures on the hinge and bolts after assembly or adjusting work.
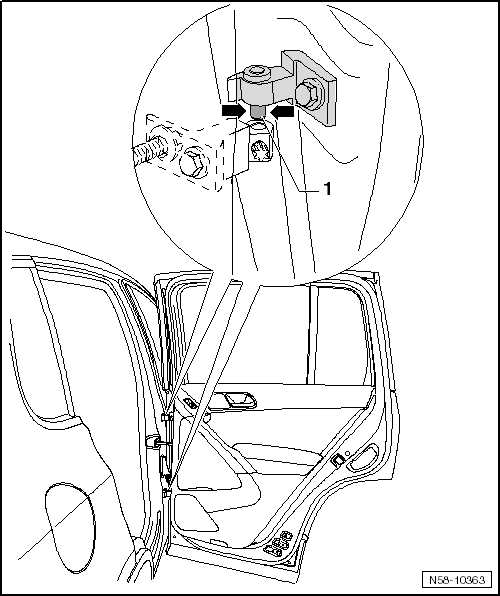
For correct gap dimension adjustment, the bolts -2, 3, 5 and 6- on the B-pillar must be loosened. The B-pillar trim panel must be removed for the bolts -2 and 5-and the Cylinder Head Bolt Socket -3410- can be used.
Other measures, such as aligning the door upward, do not work. Pressure later will cause the door to sag again.
The bolts -4 and 7- must be loosened in order to correctly adjust the flush dimension.
The Wrench - Door Adjusting -3320- and Wrench - Door Adjusting - Box Wrench -3320/3- are used for this.
Catch, Adjusting
Note
- The following describes adjusting the right rear door. Adjusting the left rear door is identical.
- When closing, the rear door must latch completely without having to press it and it must not have any play.
- The rear door must not be pushed up or down when adjusting the catch.
The catch can be used to adjust:
- If the rear door setting is not aligned with the rear side panel.
- Loosen the catch -1- by loosening the bolts -2- on the C-pillar.
- Adjust the rear door with the catch -1- so the rear door aligns with the rear side panel when it is closed (wind noise).
- Tighten the bolts -2- for the catch -1-.
Tightening specifications for bolts -2-: 20 Nm.
 Rear doors
...
 Door Components
Tools
Special tools and workshop equipment required
Torque Wrench 1331 5-50Nm -VAG1331-
Cylinder Head Bolt Socket -3410-
Roller -3356-
Trim Removal Wedge -3409-
Wiring Harness Repair Set - Hot A ...
See More:
Volkswagen Tiguan Owners Manual > Airbag system: Monitoring the Advanced Airbag System
Read and follow the introductory information and
safety information first⇒Introduction
to the subject The Advanced Airbag System (including the electronic control unit,
sensors and system wiring) is monitored continuously to make sure that it is functioning
properly whenever the ignition ...
Volkswagen Tiguan Owners Manual
Volkswagen Tiguan Service and Repair Manual
- Body exterior
- Body Interior
- General Paint Information
- Paint
- Brake System
- Suspension, Wheels, Steering
- Wheel and Tire Guide
- Towing Guide
- Wheel and Tire Guide General Information
- Communication
- Electrical Equipment General Information
- Electrical Equipment from 06/2011
- Heating, Ventilation and Air Conditioning
- Refrigerant R134a Servicing
- 6-Speed Manual Transmission 02Q, OBB, and OFB
