Volkswagen Tiguan Service and Repair Manual: Rear Lid
Tools
Special tools and workshop equipment required
- Torque Wrench 1331 5-50Nm -VAG1331-
Overview - Rear Lid
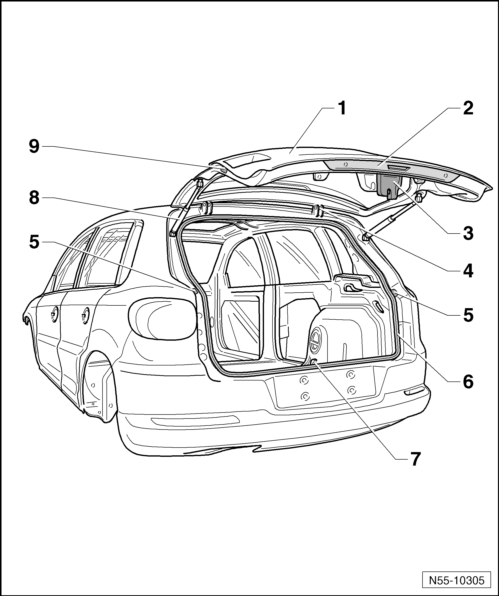
- Rear Lid
- Removing.
- Installing.
- Adjusting.
- Grip Piece with Button
- Removing.
- Also possible with rearview camera
- Hood Latch
- Removing.
- Hinge
- Removing.
- Stop
- Seal
- Catch
- Removing.
- Adjusting.
- Gas-Filled Strut
- Removing.
- Venting.
- Stop Buffer
- Adjusting.
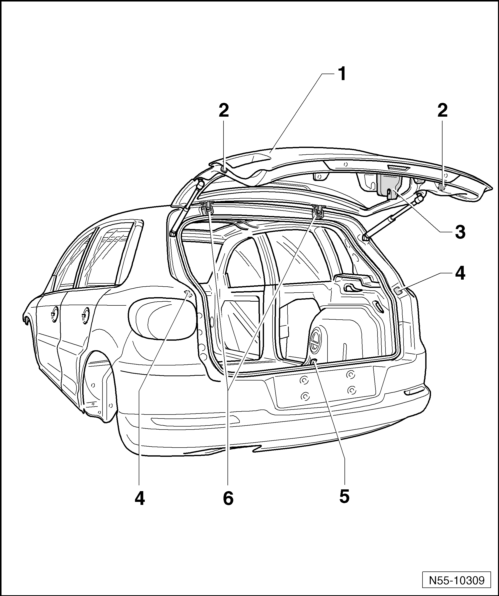
Rear Lid, Removing and Installing
Removing

- Remove the rear lid trim panel.
- Remove the roof end strip.
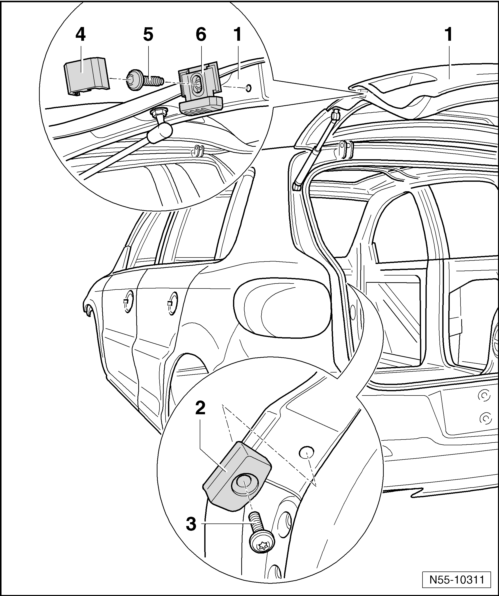
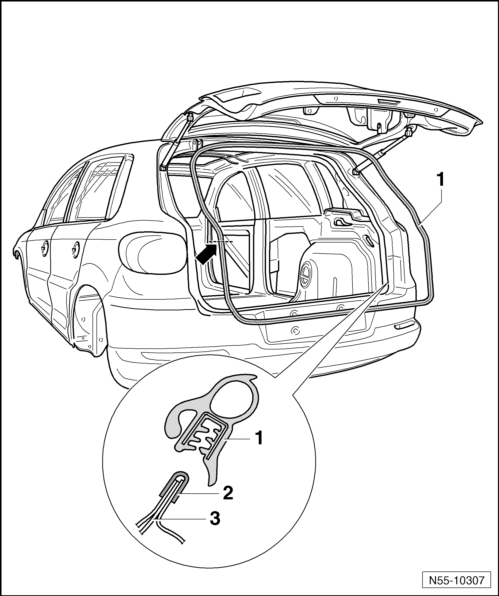
- Disconnect the connectors in the rear lid -1-.
- Release the hooks -arrows- of the frame -5- for the boots -6-.
- Guide the wires -4- through the opening and out of the rear lid.
A second technician is required for the rest of the removal procedure.
- Loosen the bolts -3-, but do not remove.
- Remove the gas-filled strut -2-.
- Remove the bolts -3-.
Installing
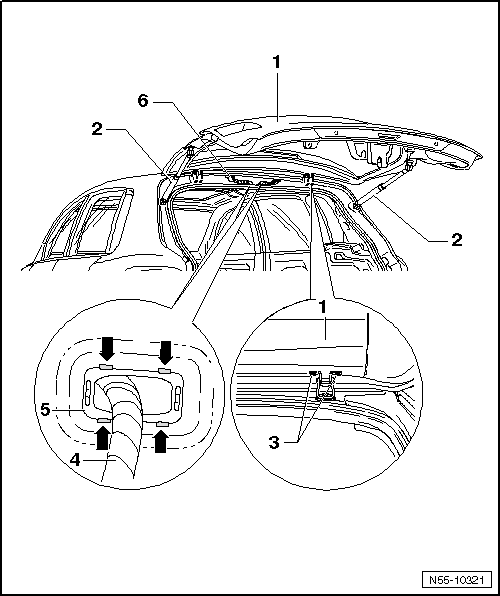
- Install the bolts -3-.
- Guide the wires -4- through the opening in the rear lid -1- and engage the frame -5- for the boots -6-.
- Adjust the rear lid and tighten the bolts -3- (tightening specification: 10 Nm).
- Install the gas-filled strut -2-.
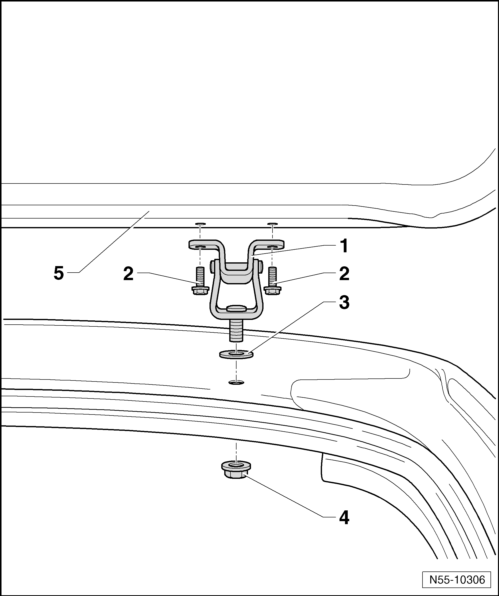
Rear Lid Hinge, Removing and Installing
Removing
- Rear Lid, -5- Removing.
- Remove the roof end strip.
- Screw the hex nut -4- in the vehicle interior downward from the threaded pin of the hinge -1- and remove the hinge -1- from the outside.
Installing

- Install the hinge -1- together with the washer -3- in the vehicle and install the hexagon nut -4- on the threaded pin -1- on the hinge.
- Align the hinge on the rear lid -5-.
- Tightening specification for hex nuts -4-: 24 Nm.
- Tightening specification for bolts -2-: 10 Nm.
Overview - Rear Lid Locking and Unlocking Components
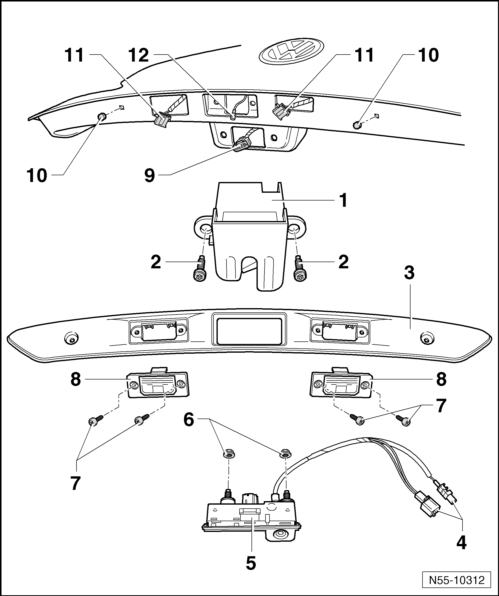
- Hood Latch
- Removing and installing.
- Bolt
- Tightening specification: 23 Nm.
- Quantity: 2
- Grip Piece with Button
- Tightening specification for screws: 2 Nm
- Removing and installing.
- Connectors
- For the rearview camera
- Button
- The button with rearview camera is shown here
- Is clipped into the grip
- Nut
- Tightening specification: 4 Nm.
- Quantity: 2
- Bolt
- Tightening specification 1 Nm.
- 2 each per lamp
- License Plate Lamp
- Connector
- For lid latch
- Speed Nut
- Quantity: 2
- Connector
- For license plate lamp
- Connector
- For the button
Hood Latch, Removing and Installing
Removing
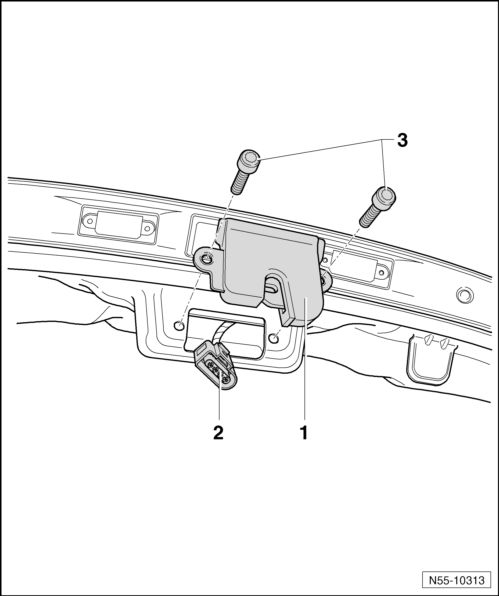
- Remove the rear lid trim panel.
- Remove the bolts -3- and the latch -1- from the rear lid.
- Detach the connector -2- on the back of the latch.
In case of an electrical malfunction, the rear lid can be opened using the emergency release. The emergency release is reached through an opening in the rear lid trim.
Installing

- Secure the connector -2- on the back of the latch.
- Insert the latch -1- into the rear lid and tighten the bolts -3- (tightening specification: 22 Nm).
Catch, Removing and Installing
Removing

- Remove the lock carrier cover.
- Remove the bolts -2- and remove the catch -1-.
Installing
- Position the catch -1- and install the bolts -2-.
- Tightening specifications for bolts -2-: 18 Nm
- Adjust the catch.
Grip Piece with Release Button, Removing and Installing
Removing
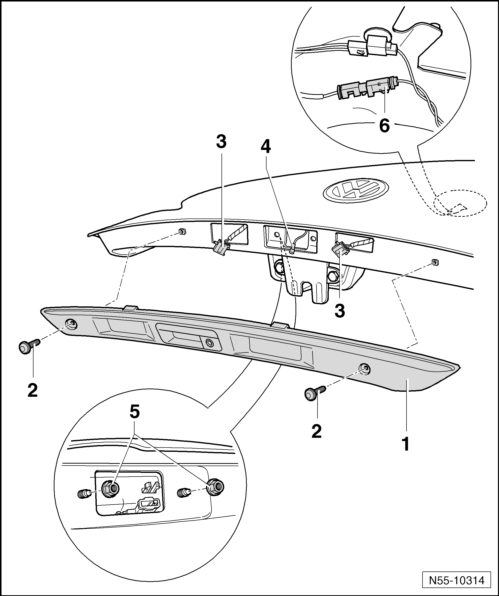
- Remove the rear lid trim panel.
- Disconnect the connector -6- in the rear lid.
- Remove the hex nuts -5- from the button threaded pins in the rear lid.
- Remove the screws -2- and remove the grip piece -1- from the rear lid.
- Disconnect the connectors -3 and 4-.
In case of an electrical malfunction, the rear lid can be opened at the latch emergency release.
The emergency release is reached through an opening in the rear lid trim.
Installing

- Connect the connectors -3 and 4-.
- Mount the grip piece -1- on the rear lid and tighten the hex nuts -5- on the button threaded pins (tightening specification: 4 Nm).
- Connect the connector -6- in the rear lid.
- Tighten the screws -2- for the grip piece (tightening specification: 2 Nm).
Rear Lid, Adjusting
Note
- Vehicle must be on ground to adjust rear lid.
- The hood latch -3- is bolted directly to the rear lid -1-. It does not have any oblong holes so it cannot be adjusted.
- The left and right stop buffers -2- are not meant for adjusting. Their function is to stabilize and to cushion the rear lid -1-.
- The rear lid is properly adjusted when there is an overall even gap dimension when closed, it is not too far inward or outward and contours align.
- The rear lid must engage in the catch -5- without great force.
The adjustment of the rear lid is described in multiple steps.
To adjust or check the gap dimensions, use Gauge - Gap Adjustment -3371-.

- By loosening the bolts -4- the rear lid can be adjusted -1- in the elongated holes in the hinge -3- in the direction of-arrow a and b-.
- In addition, the hinge -3- can be adjusted slightly at the threaded pins after loosening the nuts -2-.
- After adjusting, apply a corrosion protectant to the hinge and bolts.
- Rear lid -1- at the catch.
- Adjust the left and right stop buffers -2-.
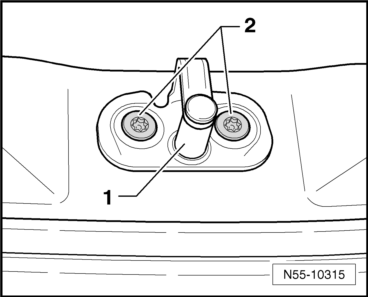
Catch, Adjusting
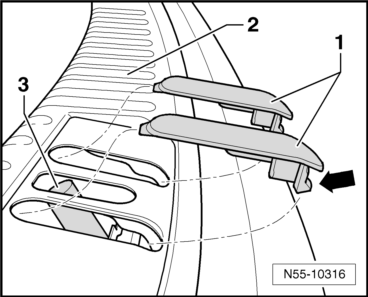
- Release the retaining hooks -arrow- on both trim pieces -1-.
- Remove the trim -1- from the lock carrier cover -2-.
Note
- The catch -2- can slide into the oversized holes by loosening bolts -1-.
- Adjust the catch -1- so that the opening of the rear lid latch with detent engages at the center of the catch -1-.

- Loosen the stop buffers.
- Loosen the bolts -2- on the catch -1-.
- Bring the catch -1- into the top position and tighten the bolts -2-.
- Close rear lid and check adjustment.
- Tightening specifications for bolts -2-: 18 Nm
Stop Buffer, Adjusting
The stop -2- is securely mounted (tightening specification for bolt -3-: 10 Nm).
The stop cannot be adjusted.
- Lift cover -4- from stop buffer.
- Loosen the screw -5- on the stop buffer -6- slightly until stop buffer can be moved to highest position.
- Close rear lid to initial locking position -1- using light pressure over center.
- Open rear lid again.
- Tighten the bolt -5- (tightening specification: 10 Nm).
- Press cover -4- onto stop buffer.
Overview - Gas-Filled Strut
- Gas-Filled Strut
- Removing.
- Venting.
- Bracket
- With ball stud
- Bolts
- Tightening specification: 10 Nm.
- Quantity: 2 for each bracket
- Ball Stud
- Tightening specification: 20 Nm
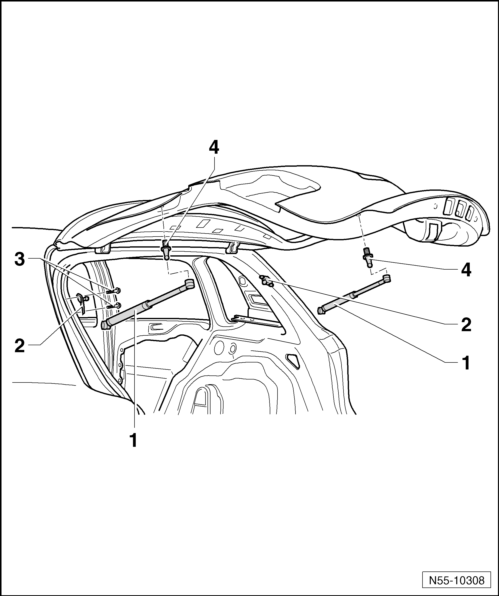
Gas-Filled Strut, Removing and Installing
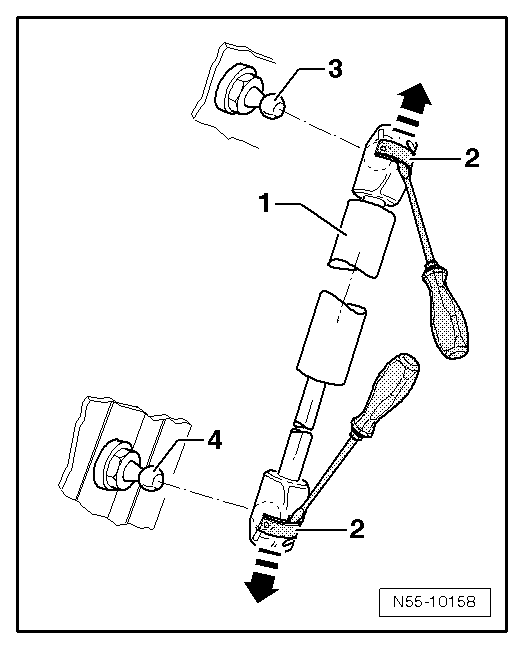
- Open and support rear lid.
- Reach under the spring clips -2- using a small screwdriver.
- Raise the spring clips-2- just far enough so they can slide over the ball socket in direction of the -arrow-.
- Remove the gas-filled strut -1- from the ball studs -3- and -4-.
After removing the gas-filled strut -1-, slide the spring clips -2- back again immediately.
WARNING
Proceed carefully when reusing a gas-filled strut. Do not pry the spring clip completely out of the ball socket or the spring clip will be damaged. The gas-filled strut will spring out of the mount, resulting in damage or injury to the technician.
- Release the pressure from gas-filled strut.
Gas-Filled Strut, Venting
- Clamp the area -x- of the gas strut in the vise, area -x- = 50 mm.
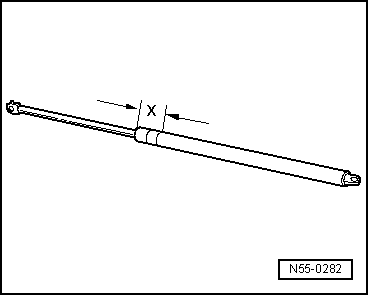
WARNING
Only clamp the gas strut in area -x-. Otherwise, an accident may occur.
- Cut open the gas-filled strut cylinder within the first third of the total cylinder length using the piston rod side of the cylinder as a reference point.
Note
- Always wear eye protection when sawing.
- Cover the area of the sawed portion with a clean cloth.
- Dispose of the oil and cleaning cloths properly.
Rear Lid Seal
The seal on the rear lid is equipped at the factory with a sealant, applied to body flange and then rolled on.
Note
- When the seal is removed, the sealant spreads on the inner side of the seal and the sides bend up slightly. If the seal is reinstalled, the sealing ability and secure fit cannot be guaranteed.
- For this reason, every completely removed seal must be replaced with a so-called "hammer-stroke seal".
- For partially removed seals, seal flanks must be pressed together before installation.
Rear Lid Seal, Removing and Installing
Removing

- Remove the rear lid seal -1- from body flange -3-.
Installing
Body flange -3- is taped in lower area with commercially available fabric adhesive tape -2-
- Align rear lid seal -1- with vulcanized point -arrow- to center of left tail lamp.
 Hood
Hood
Tools
Special tools and workshop equipment required
Torque Wrench 1331 5-50Nm -VAG1331-
Pry Lever -80 - 200-
Overview - Hood
Hood
Removing and installing.
Adjusting.
Adjusting Buffer
...
 Fuel Filler Door Unit
Overview - Fuel Filler Door Unit and Adjusting Element
Note
If tank flap does not open, it can be opened by hand via the actuator
-4-.
The actuator can be reached by grabbing between the side pane ...
See More:
Volkswagen Tiguan Owners Manual > Exterior care and cleaning: Cleaning the engine compartment
Read and follow the introductory information and
safety information first⇒Introduction
to the subject The engine compartment of a vehicle is a dangerous area ⇒ Preparations
for working in the engine compartment .
If necessary, the engine compartment should be cleaned by an authorized ...
Volkswagen Tiguan Owners Manual
Volkswagen Tiguan Service and Repair Manual
- Body exterior
- Body Interior
- General Paint Information
- Paint
- Brake System
- Suspension, Wheels, Steering
- Wheel and Tire Guide
- Towing Guide
- Wheel and Tire Guide General Information
- Communication
- Electrical Equipment General Information
- Electrical Equipment from 06/2011
- Heating, Ventilation and Air Conditioning
- Refrigerant R134a Servicing
- 6-Speed Manual Transmission 02Q, OBB, and OFB
