Volkswagen Tiguan Service and Repair Manual: Lock Carrier
Tools
Required Special Tools and Equipment
Special tools and workshop equipment required
- Guide Pins -T10093
- Torque Wrench 1331 5-50Nm -VAG1331-
- Torque Wrench 1332 40-200Nm -VAG1332
Overview - Lock Carrier
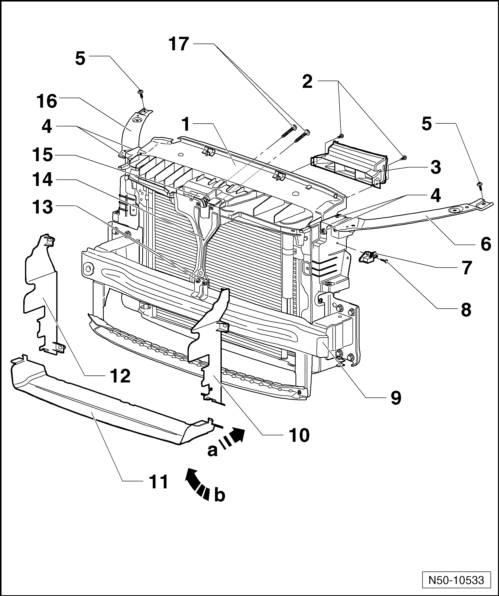
- Lock Carrier with Attachments
- Removing and installing
- Service position
- Screw
- Tightening specification: 2 Nm
- Quantity: 2
- Air Duct
- Bolt
- Tightening specification: 8 Nm
- 2 per page
- Bolt
- Tightening specification: 8 Nm
- 1 per side
- Left Bracket
- Driver Front Airbag Crash Sensor
- Not for all countries
- Left and right
- For driver front airbag crash sensor
- For passenger front airbag crash sensor
- Bolt
- Tightening specification: 6 Nm
- Crossmember
- Left Air Vent
- Lower Air Vent
- Right Air Vent
- Bolt
- Tightening specification: 8 Nm
- Quantity: 2
- Lock Support
- Lock
- Left Bracket
- Bolt
- Tightening specification: 12 Nm.
- Quantity: 2
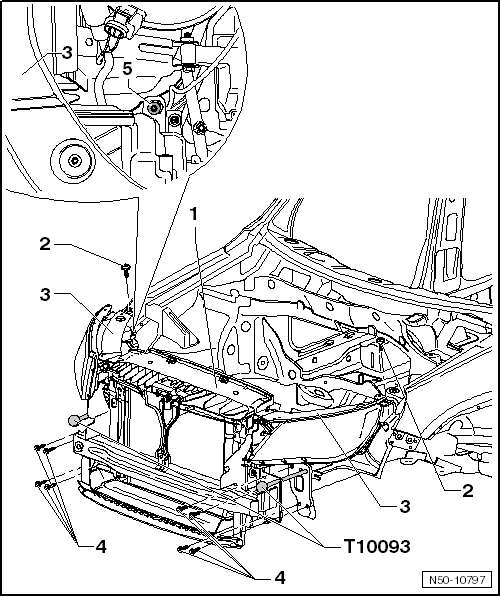
Service Position
Moving into Service Position
- Remove the front bumper cover (18º slope angle).
- Remove the front bumper cover (28º slope angle).
- In vehicles with charge air cooler, loosen the pressure hoses.
- Remove the bolts -4- at left and right longitudinal member.
- Remove rear bolt -5- from the left and right headlamp.
- Install the Guide Pins - T 10093- on the left and right longitudinal member.
- Remover the left and right bolts -2- at the top of the brackets -3-.
- The lock carrier -1- with the brackets -3- can be pulled approximately 10 cm forward onto the Guide Pins -T10093-.
Service Position, Resetting
Install in reverse order of removal.
- For bolt tightening specifications, see the overview.
- Align the lock carrier with the attachments on the longitudinal members and between the fenders.
- Secure the headlamp and check the headlamp setting.
Note
- Make sure that pressure hoses for charge air cooler are re-engaged correctly.
- Hoses and lines must not be pinched.
Pressure Hoses, Removing
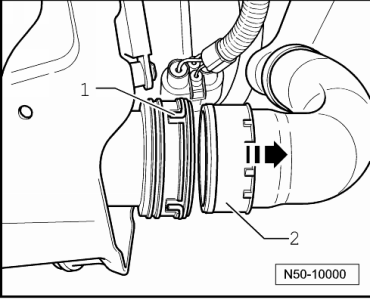
- Disengage connector coupling -1- and disconnect pressure hose -2- in direction of -arrow- from coupling.
- When connecting the pressure hoses, make sure that the connector coupling engages audibly.
Lock Carrier with Attachments, Removing and Installing
Removing
Note
- The lock carrier is a safety-related component and for this reason it may not be serviced.
- If damaged, replace the lock carrier.
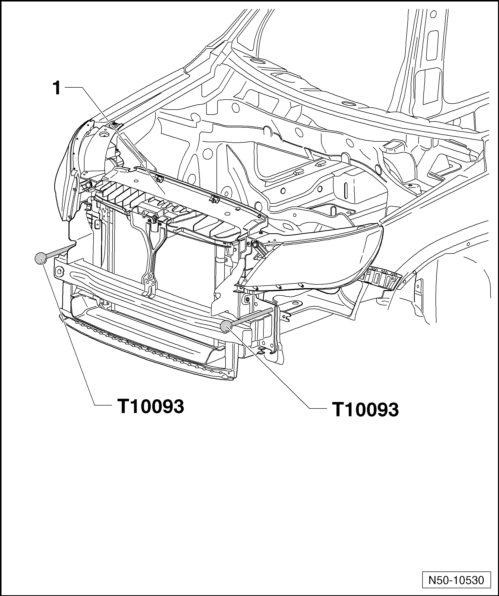
- Bring the lock carrier and its attachments into the service position -1-.
- Disconnect the any connectors present.
- Disconnect the connector for the crash sensor.
- Drain the coolant and disconnect the coolant line.
- Disconnect the condenser lines.
- With a second technician, remove the Guide Pins -T10093- from the longitudinal member on left and right sides and lift out the lock carrier.
WARNING
Do not start the engine whenever the A/C system or coolant lines are disconnected.
Note
- Do not hang the condenser and hydraulic oil cooler by the lines.
- Do not kink the condenser and hydraulic lines.
Installing
Install in reverse order of removal.
- Make sure that all plug- and hose connections are correctly installed when re-assemble.
- The brackets on the longitudinal member must be installed.
- For bolt tightening specifications, see the overview.
- Align the lock carrier with the longitudinal members and between the fenders.
- Secure the headlamp and check the headlamp setting.
Overview - Bracket for Bumper Bracket
- Bracket
- Left and right
- Bolt
- Quantity: 2 on each side
- Tightening specification: 55 Nm
 Body front
...
 Fender
Tools
Special tools and workshop equipment required
Torque Wrench 1783 - 2-10Nm -VAG1783-
Overview - Front Fender
Note
The illustration shows the left side. The right side is identical.
Fender
...
See More:
Volkswagen Tiguan Service and Repair Manual > Wheels, Tires, Wheel Alignment: Wheels and Tires, Mounting
General Information
Since MY 2005, all vehicles have a new disc wheels with revised contour.
For mounting tires, the shop mounting device must be equipped with tire
mounting fixture intended for this disc wheels.
WARNING
Otherwise, there is a danger of damaging the disc wheel.
If tire mounting devi ...
Volkswagen Tiguan Owners Manual
Volkswagen Tiguan Service and Repair Manual
- Body exterior
- Body Interior
- General Paint Information
- Paint
- Brake System
- Suspension, Wheels, Steering
- Wheel and Tire Guide
- Towing Guide
- Wheel and Tire Guide General Information
- Communication
- Electrical Equipment General Information
- Electrical Equipment from 06/2011
- Heating, Ventilation and Air Conditioning
- Refrigerant R134a Servicing
- 6-Speed Manual Transmission 02Q, OBB, and OFB
